Mini Jogo em Unity | CUBEavoid
O CUBEavoid é um mini-jogo feito em Unity. Código-fonte e configuração abaixo.
O objetivo é evitar o cubo pequeno redimensionando o cubo grande com o cursor do mouse.
Etapa 1: crie todos os scripts necessários
- Crie um novo script, chame-o de SC_PlayerCube.cs, remova tudo dele e cole o código abaixo dentro dele:
SC_PlayerCube.cs
using System.Collections;
using System.Collections.Generic;
using UnityEngine;
using UnityEngine.UI;

public class SC_PlayerCube : MonoBehaviour
{
    //Assign enemy mesh renderer
    public MeshRenderer enemy;
    public Text gameOverText;

    Transform thisT;
    MeshRenderer mr;

    //Global static variable
    public static bool GameOver = false;

    // Start is called before the first frame update
    void Start()
    {
        thisT = transform;
        mr = GetComponent<MeshRenderer>();
        gameOverText.enabled = false;
    }

    // Update is called once per frame
    void Update()
    {
        if (GameOver)
            return;

        if (gameOverText.enabled)
        {
            //Game has resumed, disable game over text
            gameOverText.enabled = false;
        }

        //Scale player cube with mouse movement
        Vector3 playerScale = (new Vector3(Screen.width / 2 - Input.mousePosition.x, 1, Screen.height / 2 - Input.mousePosition.y)).normalized * 10;
        //Keep Y scale at 10
        playerScale.y = 10;
        //Limit minimum X and Z scale to 0.1
        if (playerScale.x >= 0 && playerScale.x < 0.1f)
        {
            playerScale.x = 0.1f;
        }
        else if (playerScale.x < 0 && playerScale.x > -0.1f)
        {
            playerScale.x = -0.1f;
        }
        if (playerScale.z >= 0 && playerScale.z < 0.1f)
        {
            playerScale.z = 0.1f;
        }
        else if (playerScale.z < 0 && playerScale.z > -0.1f)
        {
            playerScale.z = -0.1f;
        }
        thisT.localScale = playerScale;

        //Check if enemy have intersected with the player, if so, stop the game
        if (mr.bounds.Intersects(enemy.bounds))
        {
            GameOver = true;
            gameOverText.enabled = true;
        }
    }
}- Crie um novo script, chame-o de SC_EnemyCube.cs, remova tudo dele e cole o código abaixo dentro dele:
SC_EnemyCube.cs
using System.Collections;
using System.Collections.Generic;
using UnityEngine;

//This script controls enemy cube AI
public class SC_EnemyCube : MonoBehaviour
{
    //Private variables
    Camera mainCamera;
    float movementTime = 0;
    Vector3 startPoint;
    Vector3 endPoint;

    // Start is called before the first frame update
    void Start()
    {
        //Get camera tagged "MainCamera"
        mainCamera = Camera.main;
        GenerateStartEndPoint();
    }

    //Assign start and end points slightly outside the Camera view
    void GenerateStartEndPoint()
    {
        Vector3 relativeStart;
        Vector3 relativeEnd;

        //Randomly pick whether to go Left <-> Right or Up <-> Down
        if (Random.Range(-10, 10) > 0)
        {
            relativeStart = new Vector3(Random.Range(-10, 10) > 0 ? 1.1f : -0.1f, Random.Range(0.00f, 1.00f), mainCamera.transform.position.y);
            if (relativeStart.y > 0.4f && relativeStart.y < 0.6f)
            {
                if(relativeStart.y >= 0.5f)
                {
                    relativeStart.y = 0.6f;
                }
                else
                {
                    relativeStart.y = 0.4f;
                }
            }
            relativeEnd = relativeStart;
            relativeEnd.x = relativeEnd.x > 1 ? -0.1f : 1.1f;
        }
        else
        {
            relativeStart = new Vector3(Random.Range(0.00f, 1.00f), Random.Range(-10, 10) > 0 ? 1.1f : -0.1f, mainCamera.transform.position.y);
            if (relativeStart.x > 0.4f && relativeStart.x < 0.6f)
            {
                if (relativeStart.x >= 0.5f)
                {
                    relativeStart.x = 0.6f;
                }
                else
                {
                    relativeStart.x = 0.4f;
                }
            }
            relativeEnd = relativeStart;
            relativeEnd.y = relativeEnd.y > 1 ? -0.1f : 1.1f;
        }

        //Convert screen points to world points
        startPoint = mainCamera.ViewportToWorldPoint(relativeStart);
        endPoint = mainCamera.ViewportToWorldPoint(relativeEnd);

        //Reset movement time
        movementTime = 0;
    }

    // Update is called once per frame
    void Update()
    {
        //Game over, wait for click
        if (SC_PlayerCube.GameOver)
        {
            //Click to resume
            if (Input.GetMouseButtonDown(0))
            {
                SC_PlayerCube.GameOver = false;
                GenerateStartEndPoint();
            }
            else
            {
                return;
            }
        }

        //Move enemy from one side to the other
        if(movementTime < 1)
        {
            movementTime += Time.deltaTime * 0.5f;

            transform.position = Vector3.Lerp(startPoint, endPoint, movementTime);
        }
        else
        {
            //Re-generate start / end point
            GenerateStartEndPoint();
        }
    }
}
Etapa 2: Configuração
Após a criação dos 2 scripts principais, vamos prosseguir com a configuração do jogo:
- Crie uma nova cena se ainda não o fez
- Selecione a câmera principal, altere sua posição para (0, 10, 0) e sua rotação para (90, 0, 0)
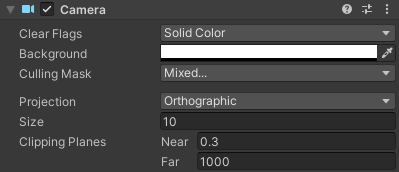
- Alterar as propriedades do componente Câmera da Câmera Principal: Limpar sinalizadores para 'Solid Color', Plano de fundo para 'white', Projeção para 'Orthographic' e Tamanho para '10'
- Crie um novo cubo (Objeto do jogo -> Objeto 3D -> Cubo) e nomeie-o "Player"
- Altere a posição "Player" para (0, 0, 0) e a escala para (10, 10, 10)
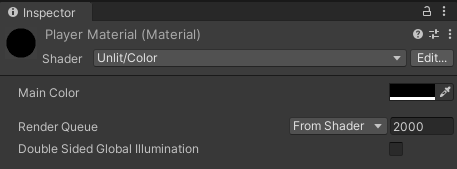
- Crie um novo material (clique com o botão direito na pasta Projeto -> Criar -> Material) e nomeie-o "PlayerMaterial"
- Altere o "PlayerMaterial" Shader para Unlit/Color e altere sua cor para preto
- Atribuir "PlayerMaterial" ao cubo "Player"
- Duplique o cubo "Player" e renomeie-o para "Enemy"
- Alterar a escala "Enemy" para (0,7, 0,7, 0,7)
- Duplique "PlayerMaterial" e renomeie-o para "EnemyMaterial"
- Alterar a cor hexadecimal "EnemyMaterial" para 157EFB
- Por fim, atribua "EnemyMaterial" ao cubo "Enemy"

Vamos criar uma interface de usuário simples:
- Crie um novo texto de IU (Objeto do jogo -> IU -> Texto), renomeie-o para "GameOverText"
- Certifique-se de que o alinhamento RectTransform para o novo texto esteja definido como Centro do meio
- Defina o texto Pos X e Pos Y como 0
- Alterar altura para 100
- Para o componente Texto, defina o texto abaixo (certifique-se de que a propriedade Rich Text esteja marcada):
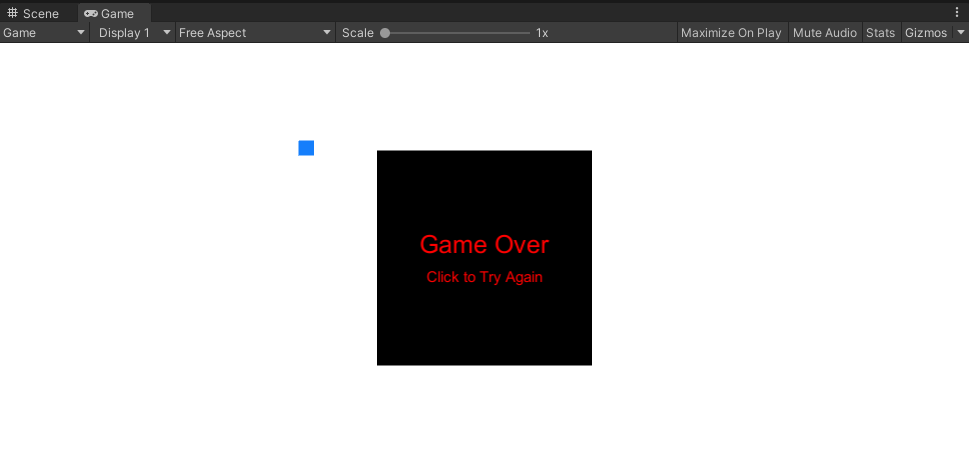
Game Over
<size=15>Click to Try Again</size>- Defina o tamanho da fonte para 25
- Definir alinhamento de texto para centro médio
- Definir cor do texto para vermelho
Por fim, vamos atribuir os scripts:
- Selecione o cubo "Player" e atribua o script SC_PlayerCube a ele
- Atribuir o cubo "Enemy" à variável Enemy
- Atribua "GameOverText" à variável Game Over Text

- Selecione o cubo "Enemy" e atribua o script SC_EnemyCube a ele
Agora, ao pressionar Play, o cubo azul deve começar a se mover pela tela, o que você precisa evitar redimensionando o cubo preto usando o cursor do mouse.
Sinta-se à vontade para melhorar este jogo de qualquer maneira.