Como fazer um FPS com o suporte AI no Unity
O tiro em primeira pessoa (FPS) é um subgênero de jogos de tiro em que o jogador é controlado de uma perspectiva de primeira pessoa.
Para fazer um jogo FPS em Unity vamos precisar de um controlador de jogador, uma série de itens (armas neste caso) e os inimigos.
Etapa 1: criar o controlador do player
Aqui vamos criar um controller que será usado pelo nosso player.
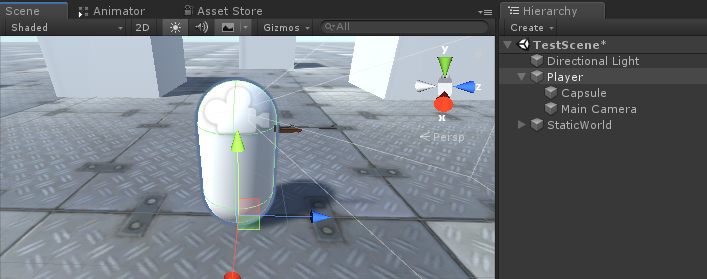
- Crie um novo Game Object (Game Object -> Create Empty) e nomeie-o "Player"
- Crie uma nova Cápsula (Objeto do Jogo -> Objeto 3D -> Cápsula) e mova-a para dentro do Objeto "Player"
- Remova o componente Capsule Collider da cápsula e mude sua posição para (0, 1, 0)
- Mova a câmera principal dentro do objeto "Player" e mude sua posição para (0, 1.64, 0)
- Crie um novo script, nomeie-o como "SC_CharacterController" e cole o código abaixo dentro dele:
SC_CharacterController.cs
using UnityEngine;

[RequireComponent(typeof(CharacterController))]

public class SC_CharacterController : MonoBehaviour
{
    public float speed = 7.5f;
    public float jumpSpeed = 8.0f;
    public float gravity = 20.0f;
    public Camera playerCamera;
    public float lookSpeed = 2.0f;
    public float lookXLimit = 45.0f;

    CharacterController characterController;
    Vector3 moveDirection = Vector3.zero;
    Vector2 rotation = Vector2.zero;

    [HideInInspector]
    public bool canMove = true;

    void Start()
    {
        characterController = GetComponent<CharacterController>();
        rotation.y = transform.eulerAngles.y;
    }

    void Update()
    {
        if (characterController.isGrounded)
        {
            // We are grounded, so recalculate move direction based on axes
            Vector3 forward = transform.TransformDirection(Vector3.forward);
            Vector3 right = transform.TransformDirection(Vector3.right);
            float curSpeedX = canMove ? speed * Input.GetAxis("Vertical") : 0;
            float curSpeedY = canMove ? speed * Input.GetAxis("Horizontal") : 0;
            moveDirection = (forward * curSpeedX) + (right * curSpeedY);

            if (Input.GetButton("Jump") && canMove)
            {
                moveDirection.y = jumpSpeed;
            }
        }

        // Apply gravity. Gravity is multiplied by deltaTime twice (once here, and once below
        // when the moveDirection is multiplied by deltaTime). This is because gravity should be applied
        // as an acceleration (ms^-2)
        moveDirection.y -= gravity * Time.deltaTime;

        // Move the controller
        characterController.Move(moveDirection * Time.deltaTime);

        // Player and Camera rotation
        if (canMove)
        {
            rotation.y += Input.GetAxis("Mouse X") * lookSpeed;
            rotation.x += -Input.GetAxis("Mouse Y") * lookSpeed;
            rotation.x = Mathf.Clamp(rotation.x, -lookXLimit, lookXLimit);
            playerCamera.transform.localRotation = Quaternion.Euler(rotation.x, 0, 0);
            transform.eulerAngles = new Vector2(0, rotation.y);
        }
    }
}- Anexe o script SC_CharacterController ao objeto "Player" (Você notará que ele também adicionou outro componente chamado Character Controller, alterando seu valor central para (0, 1, 0))
- Atribua a câmera principal à variável Player Camera em SC_CharacterController
O controlador Player agora está pronto:
Etapa 2: criar o sistema de armas
O sistema de armas do jogador consistirá em 3 componentes: um gerenciador de armas, um script de arma e um script de bala.
- Crie um novo script, nomeie-o como "SC_WeaponManager" e cole o código abaixo dentro dele:
SC_WeaponManager.cs
using UnityEngine;

public class SC_WeaponManager : MonoBehaviour
{
    public Camera playerCamera;
    public SC_Weapon primaryWeapon;
    public SC_Weapon secondaryWeapon;

    [HideInInspector]
    public SC_Weapon selectedWeapon;

    // Start is called before the first frame update
    void Start()
    {
        //At the start we enable the primary weapon and disable the secondary
        primaryWeapon.ActivateWeapon(true);
        secondaryWeapon.ActivateWeapon(false);
        selectedWeapon = primaryWeapon;
        primaryWeapon.manager = this;
        secondaryWeapon.manager = this;
    }

    // Update is called once per frame
    void Update()
    {
        //Select secondary weapon when pressing 1
        if (Input.GetKeyDown(KeyCode.Alpha1))
        {
            primaryWeapon.ActivateWeapon(false);
            secondaryWeapon.ActivateWeapon(true);
            selectedWeapon = secondaryWeapon;
        }

        //Select primary weapon when pressing 2
        if (Input.GetKeyDown(KeyCode.Alpha2))
        {
            primaryWeapon.ActivateWeapon(true);
            secondaryWeapon.ActivateWeapon(false);
            selectedWeapon = primaryWeapon;
        }
    }
}- Crie um novo script, nomeie-o "SC_Weapon" e cole o código abaixo dentro dele:
SC_Weapon.cs
using System.Collections;
using UnityEngine;

[RequireComponent(typeof(AudioSource))]

public class SC_Weapon : MonoBehaviour
{
    public bool singleFire = false;
    public float fireRate = 0.1f;
    public GameObject bulletPrefab;
    public Transform firePoint;
    public int bulletsPerMagazine = 30;
    public float timeToReload = 1.5f;
    public float weaponDamage = 15; //How much damage should this weapon deal
    public AudioClip fireAudio;
    public AudioClip reloadAudio;

    [HideInInspector]
    public SC_WeaponManager manager;

    float nextFireTime = 0;
    bool canFire = true;
    int bulletsPerMagazineDefault = 0;
    AudioSource audioSource;

    // Start is called before the first frame update
    void Start()
    {
        bulletsPerMagazineDefault = bulletsPerMagazine;
        audioSource = GetComponent<AudioSource>();
        audioSource.playOnAwake = false;
        //Make sound 3D
        audioSource.spatialBlend = 1f;
    }

    // Update is called once per frame
    void Update()
    {
        if (Input.GetMouseButtonDown(0) && singleFire)
        {
            Fire();
        }
        if (Input.GetMouseButton(0) && !singleFire)
        {
            Fire();
        }
        if (Input.GetKeyDown(KeyCode.R) && canFire)
        {
            StartCoroutine(Reload());
        }
    }

    void Fire()
    {
        if (canFire)
        {
            if (Time.time > nextFireTime)
            {
                nextFireTime = Time.time + fireRate;

                if (bulletsPerMagazine > 0)
                {
                    //Point fire point at the current center of Camera
                    Vector3 firePointPointerPosition = manager.playerCamera.transform.position + manager.playerCamera.transform.forward * 100;
                    RaycastHit hit;
                    if (Physics.Raycast(manager.playerCamera.transform.position, manager.playerCamera.transform.forward, out hit, 100))
                    {
                        firePointPointerPosition = hit.point;
                    }
                    firePoint.LookAt(firePointPointerPosition);
                    //Fire
                    GameObject bulletObject = Instantiate(bulletPrefab, firePoint.position, firePoint.rotation);
                    SC_Bullet bullet = bulletObject.GetComponent<SC_Bullet>();
                    //Set bullet damage according to weapon damage value
                    bullet.SetDamage(weaponDamage);

                    bulletsPerMagazine--;
                    audioSource.clip = fireAudio;
                    audioSource.Play();
                }
                else
                {
                    StartCoroutine(Reload());
                }
            }
        }
    }

    IEnumerator Reload()
    {
        canFire = false;

        audioSource.clip = reloadAudio;
        audioSource.Play();

        yield return new WaitForSeconds(timeToReload);

        bulletsPerMagazine = bulletsPerMagazineDefault;

        canFire = true;
    }

    //Called from SC_WeaponManager
    public void ActivateWeapon(bool activate)
    {
        StopAllCoroutines();
        canFire = true;
        gameObject.SetActive(activate);
    }
}- Crie um novo script, nomeie-o "SC_Bullet" e cole o código abaixo dentro dele:
SC_Bullet.cs
using System.Collections;
using UnityEngine;

public class SC_Bullet : MonoBehaviour
{
    public float bulletSpeed = 345;
    public float hitForce = 50f;
    public float destroyAfter = 3.5f;

    float currentTime = 0;
    Vector3 newPos;
    Vector3 oldPos;
    bool hasHit = false;

    float damagePoints;

    // Start is called before the first frame update
    IEnumerator Start()
    {
        newPos = transform.position;
        oldPos = newPos;

        while (currentTime < destroyAfter && !hasHit)
        {
            Vector3 velocity = transform.forward * bulletSpeed;
            newPos += velocity * Time.deltaTime;
            Vector3 direction = newPos - oldPos;
            float distance = direction.magnitude;
            RaycastHit hit;

            // Check if we hit anything on the way
            if (Physics.Raycast(oldPos, direction, out hit, distance))
            {
                if (hit.rigidbody != null)
                {
                    hit.rigidbody.AddForce(direction * hitForce);

                    IEntity npc = hit.transform.GetComponent<IEntity>();
                    if (npc != null)
                    {
                        //Apply damage to NPC
                        npc.ApplyDamage(damagePoints);
                    }
                }

                newPos = hit.point; //Adjust new position
                StartCoroutine(DestroyBullet());
            }

            currentTime += Time.deltaTime;
            yield return new WaitForFixedUpdate();

            transform.position = newPos;
            oldPos = newPos;
        }

        if (!hasHit)
        {
            StartCoroutine(DestroyBullet());
        }
    }

    IEnumerator DestroyBullet()
    {
        hasHit = true;
        yield return new WaitForSeconds(0.5f);
        Destroy(gameObject);
    }

    //Set how much damage this bullet will deal
    public void SetDamage(float points)
    {
        damagePoints = points;
    }
}
Agora, você notará que o script SC_Bullet possui alguns erros. Isso porque temos uma última coisa a fazer, que é definir a interface IEntity.
As interfaces em C# são úteis quando você precisa ter certeza de que o script que as utiliza possui determinados métodos implementados.
A interface IEntity terá um método que é ApplyDamage, que posteriormente será usado para infligir danos aos inimigos e ao nosso jogador.
- Crie um novo script, nomeie-o "SC_InterfaceManager" e cole o código abaixo dentro dele:
SC_InterfaceManager.cs
//Entity interafce
interface IEntity
{
    void ApplyDamage(float points);
}
Configurando um gerenciador de armas
Um gerenciador de armas é um objeto que residirá sob o objeto da câmera principal e conterá todas as armas.
- Crie um novo GameObject e nomeie-o "WeaponManager"
- Mova o WeaponManager dentro da câmera principal do jogador e mude sua posição para (0, 0, 0)
- Anexe o script SC_WeaponManager a "WeaponManager"
- Atribua a câmera principal à variável Player Camera em SC_WeaponManager
Configurando um Rifle
- Arraste e solte seu modelo de arma na cena (ou simplesmente crie um Cubo e estique-o se ainda não tiver um modelo).
- Dimensionar o modelo para que seu tamanho seja relativo a uma cápsula de jogador
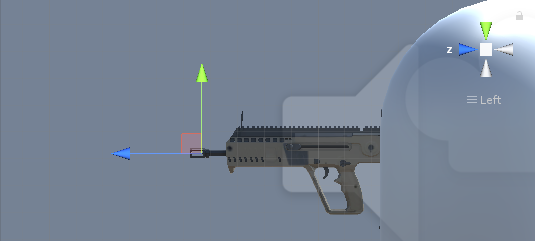
No meu caso, estarei usando um modelo de Rifle feito sob medida (BERGARA BA13):
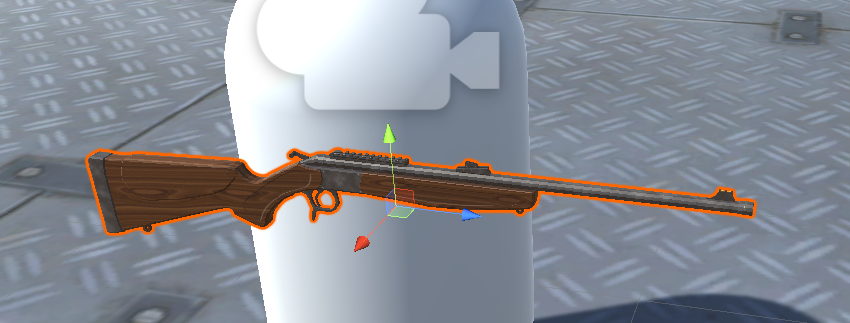
- Crie um novo GameObject e nomeie-o "Rifle" e mova o modelo do rifle para dentro dele
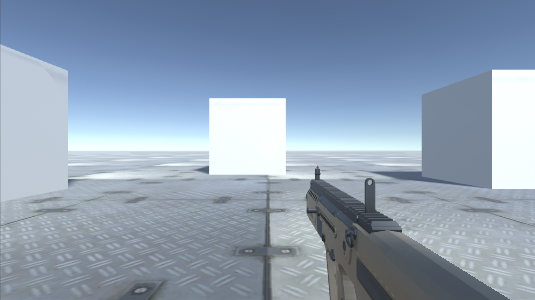
- Mova o Objeto "Rifle" para dentro do Objeto "WeaponManager" e coloque-o na frente da Câmera assim:
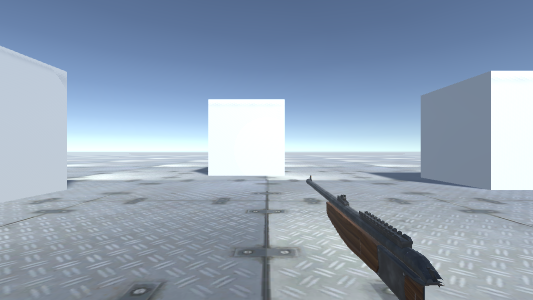
Para corrigir o recorte do objeto, basta alterar o plano de recorte próximo da câmera para algo menor (no meu caso, defino para 0,15):
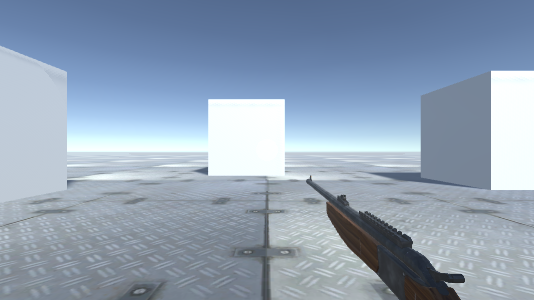
Muito melhor.
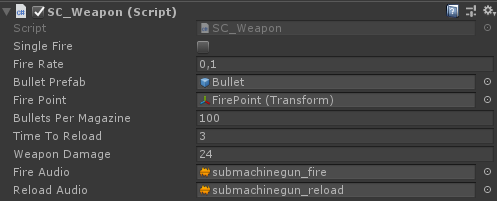
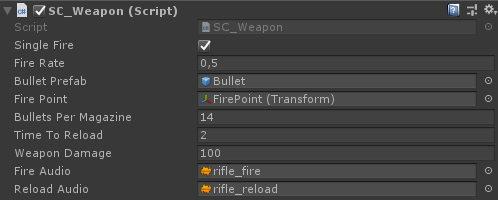
- Anexe o script SC_Weapon a um objeto Rifle (você notará que ele também adicionou um componente de fonte de áudio, necessário para reproduzir o fogo e recarregar os áudios).
Como você pode ver, SC_Weapon tem 4 variáveis para atribuir. Você pode atribuir variáveis de áudio Fire e Reload imediatamente se tiver clipes de áudio adequados em seu projeto.
A variável Bullet Prefab será explicada posteriormente neste tutorial.
Por enquanto, vamos apenas atribuir a variável Fire point:
- Crie um novo GameObject, renomeie-o para "FirePoint" e mova-o para dentro do Rifle Object. Coloque-o bem na frente do barril ou ligeiramente para dentro, assim:
- Atribuir FirePoint Transform a uma variável de ponto de fogo em SC_Weapon
- Atribuir rifle a uma variável de arma secundária no script SC_WeaponManager
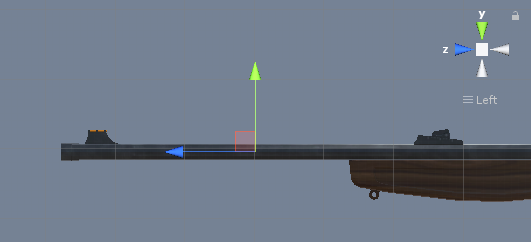
Configurando uma submetralhadora
- Duplique o Rifle Object e renomeie-o para Submachinegun
- Substitua o modelo da arma dentro dela por um modelo diferente (No meu caso usarei o modelo customizado da TAVOR X95)
- Mova a transformação do Fire Point até que se encaixe no novo modelo
- Atribuir Submachinegun a uma variável de Arma Primária no script SC_WeaponManager

Configurando um Bullet Prefab
A bala pré-fabricada será gerada de acordo com a taxa de disparo de uma arma e usará o Raycast para detectar se ela atingiu algo e infligiu danos.
- Crie um novo GameObject e nomeie-o "Bullet"
- Adicione o componente Trail Renderer a ele e altere sua variável Time para 0,1.
- Defina a curva Width para um valor menor (ex. Start 0.1 end 0), para adicionar uma trilha que parece pontuda
- Crie um novo Material e nomeie-o bullet_trail_material e mude seu Shader para Particles/Additive
- Atribua um material recém-criado a um Trail Renderer
- Altere a cor do renderizador de trilha para algo diferente (ex. Início: Laranja brilhante Fim: Laranja mais escuro)

- Salve o Bullet Object em Prefab e exclua-o da cena.
- Atribua um Prefab recém-criado (arraste e solte da visualização do projeto) para Rifle e Submachinegun Bullet Prefab variável
Submetralhadora:
Rifle:
As armas já estão prontas.
Etapa 3: criar a IA do inimigo
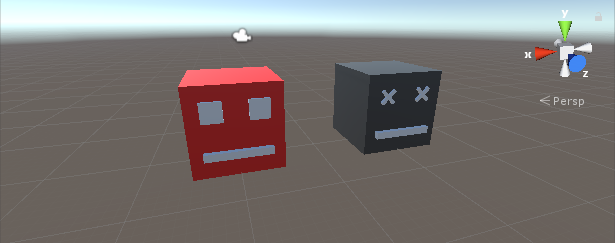
Os inimigos serão cubos simples que seguem o jogador e atacam assim que estiverem perto o suficiente. Eles atacarão em ondas, com cada onda tendo mais inimigos para eliminar.
Configurando a IA do inimigo
Abaixo eu criei 2 variações do cubo (a esquerda é para a instância viva e a direita será gerada assim que o inimigo for morto):
- Adicione um componente Rigidbody a instâncias mortas e vivas
- Salve a Instância morta no Prefab e exclua-a da Cena.
Agora, a instância viva precisará de mais alguns componentes para poder navegar no nível do jogo e infligir dano ao jogador.
- Crie um novo script e nomeie-o "SC_NPCEnemy" e cole o código abaixo dentro dele:
SC_NPCEnemy.cs
using UnityEngine;
using UnityEngine.AI;

[RequireComponent(typeof(NavMeshAgent))]

public class SC_NPCEnemy : MonoBehaviour, IEntity
{
    public float attackDistance = 3f;
    public float movementSpeed = 4f;
    public float npcHP = 100;
    //How much damage will npc deal to the player
    public float npcDamage = 5;
    public float attackRate = 0.5f;
    public Transform firePoint;
    public GameObject npcDeadPrefab;

    [HideInInspector]
    public Transform playerTransform;
    [HideInInspector]
    public SC_EnemySpawner es;
    NavMeshAgent agent;
    float nextAttackTime = 0;

    // Start is called before the first frame update
    void Start()
    {
        agent = GetComponent<NavMeshAgent>();
        agent.stoppingDistance = attackDistance;
        agent.speed = movementSpeed;

        //Set Rigidbody to Kinematic to prevent hit register bug
        if (GetComponent<Rigidbody>())
        {
            GetComponent<Rigidbody>().isKinematic = true;
        }
    }

    // Update is called once per frame
    void Update()
    {
        if (agent.remainingDistance - attackDistance < 0.01f)
        {
            if(Time.time > nextAttackTime)
            {
                nextAttackTime = Time.time + attackRate;

                //Attack
                RaycastHit hit;
                if(Physics.Raycast(firePoint.position, firePoint.forward, out hit, attackDistance))
                {
                    if (hit.transform.CompareTag("Player"))
                    {
                        Debug.DrawLine(firePoint.position, firePoint.position + firePoint.forward * attackDistance, Color.cyan);

                        IEntity player = hit.transform.GetComponent<IEntity>();
                        player.ApplyDamage(npcDamage);
                    }
                }
            }
        }
        //Move towardst he player
        agent.destination = playerTransform.position;
        //Always look at player
        transform.LookAt(new Vector3(playerTransform.transform.position.x, transform.position.y, playerTransform.position.z));
    }

    public void ApplyDamage(float points)
    {
        npcHP -= points;
        if(npcHP <= 0)
        {
            //Destroy the NPC
            GameObject npcDead = Instantiate(npcDeadPrefab, transform.position, transform.rotation);
            //Slightly bounce the npc dead prefab up
            npcDead.GetComponent<Rigidbody>().velocity = (-(playerTransform.position - transform.position).normalized * 8) + new Vector3(0, 5, 0);
            Destroy(npcDead, 10);
            es.EnemyEliminated(this);
            Destroy(gameObject);
        }
    }
}- Crie um novo script, nomeie-o "SC_EnemySpawner" e cole o código abaixo dentro dele:
SC_EnemySpawner.cs
using UnityEngine;
using UnityEngine.SceneManagement;

public class SC_EnemySpawner : MonoBehaviour
{
    public GameObject enemyPrefab;
    public SC_DamageReceiver player;
    public Texture crosshairTexture;
    public float spawnInterval = 2; //Spawn new enemy each n seconds
    public int enemiesPerWave = 5; //How many enemies per wave
    public Transform[] spawnPoints;

    float nextSpawnTime = 0;
    int waveNumber = 1;
    bool waitingForWave = true;
    float newWaveTimer = 0;
    int enemiesToEliminate;
    //How many enemies we already eliminated in the current wave
    int enemiesEliminated = 0;
    int totalEnemiesSpawned = 0;

    // Start is called before the first frame update
    void Start()
    {
        //Lock cursor
        Cursor.lockState = CursorLockMode.Locked;
        Cursor.visible = false;

        //Wait 10 seconds for new wave to start
        newWaveTimer = 10;
        waitingForWave = true;
    }

    // Update is called once per frame
    void Update()
    {
        if (waitingForWave)
        {
            if(newWaveTimer >= 0)
            {
                newWaveTimer -= Time.deltaTime;
            }
            else
            {
                //Initialize new wave
                enemiesToEliminate = waveNumber * enemiesPerWave;
                enemiesEliminated = 0;
                totalEnemiesSpawned = 0;
                waitingForWave = false;
            }
        }
        else
        {
            if(Time.time > nextSpawnTime)
            {
                nextSpawnTime = Time.time + spawnInterval;

                //Spawn enemy
                if(totalEnemiesSpawned < enemiesToEliminate)
                {
                    Transform randomPoint = spawnPoints[Random.Range(0, spawnPoints.Length - 1)];

                    GameObject enemy = Instantiate(enemyPrefab, randomPoint.position, Quaternion.identity);
                    SC_NPCEnemy npc = enemy.GetComponent<SC_NPCEnemy>();
                    npc.playerTransform = player.transform;
                    npc.es = this;
                    totalEnemiesSpawned++;
                }
            }
        }

        if (player.playerHP <= 0)
        {
            if (Input.GetKeyDown(KeyCode.Space))
            {
                Scene scene = SceneManager.GetActiveScene();
                SceneManager.LoadScene(scene.name);
            }
        }
    }

    void OnGUI()
    {
        GUI.Box(new Rect(10, Screen.height - 35, 100, 25), ((int)player.playerHP).ToString() + " HP");
        GUI.Box(new Rect(Screen.width / 2 - 35, Screen.height - 35, 70, 25), player.weaponManager.selectedWeapon.bulletsPerMagazine.ToString());

        if(player.playerHP <= 0)
        {
            GUI.Box(new Rect(Screen.width / 2 - 85, Screen.height / 2 - 20, 170, 40), "Game Over\n(Press 'Space' to Restart)");
        }
        else
        {
            GUI.DrawTexture(new Rect(Screen.width / 2 - 3, Screen.height / 2 - 3, 6, 6), crosshairTexture);
        }

        GUI.Box(new Rect(Screen.width / 2 - 50, 10, 100, 25), (enemiesToEliminate - enemiesEliminated).ToString());

        if (waitingForWave)
        {
            GUI.Box(new Rect(Screen.width / 2 - 125, Screen.height / 4 - 12, 250, 25), "Waiting for Wave " + waveNumber.ToString() + " (" + ((int)newWaveTimer).ToString() + " seconds left...)");
        }
    }

    public void EnemyEliminated(SC_NPCEnemy enemy)
    {
        enemiesEliminated++;

        if(enemiesToEliminate - enemiesEliminated <= 0)
        {
            //Start next wave
            newWaveTimer = 10;
            waitingForWave = true;
            waveNumber++;
        }
    }
}- Crie um novo script, nomeie-o "SC_DamageReceiver" e cole o código abaixo dentro dele:
SC_DamageReceiver.cs
using UnityEngine;

public class SC_DamageReceiver : MonoBehaviour, IEntity
{
    //This script will keep track of player HP
    public float playerHP = 100;
    public SC_CharacterController playerController;
    public SC_WeaponManager weaponManager;

    public void ApplyDamage(float points)
    {
        playerHP -= points;

        if(playerHP <= 0)
        {
            //Player is dead
            playerController.canMove = false;
            playerHP = 0;
        }
    }
}- Anexe o script SC_NPCEnemy à instância inimiga viva (você notará que ele adicionou outro componente chamado NavMesh Agent, que é necessário para navegar no NavMesh)
- Atribua a prefab da instância inativa criada recentemente à variável Npc Dead Prefab
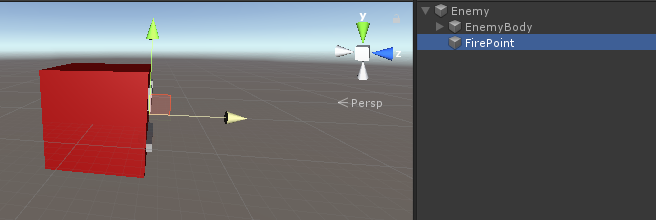
- Para o Fire Point, crie um novo GameObject, mova-o para dentro da instância do inimigo vivo e coloque-o ligeiramente à frente da instância, depois atribua-o à variável Fire Point:
- Por fim, salve a instância ativa em Prefab e exclua-a de Scene.
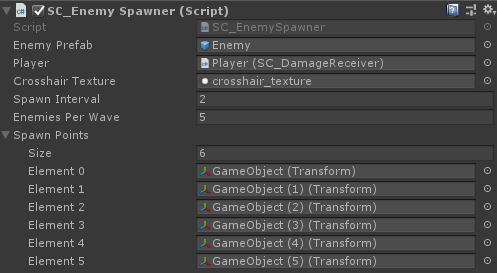
Configurando o Spawner Inimigo
Agora vamos para SC_EnemySpawner. Este script gerará inimigos em ondas e também mostrará algumas informações da interface do usuário na tela, como HP do jogador, munição atual, quantos inimigos restam em uma onda atual, etc.
- Crie um novo GameObject e nomeie-o "_EnemySpawner"
- Anexe o script SC_EnemySpawner a ele
- Atribua a IA inimiga recém-criada à variável Enemy Prefab
- Atribua a textura abaixo à variável Crosshair Texture

- Crie alguns novos GameObjects e coloque-os ao redor da cena, em seguida, atribua-os à matriz Spawn Points
Você notará que há uma última variável a ser atribuída, que é a variável Player.
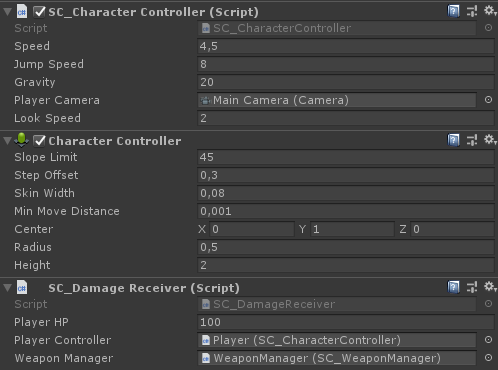
- Anexe o script SC_DamageReceiver a uma instância do Player
- Altere a tag de instância do Player para "Player"
- Atribua as variáveis Player Controller e Weapon Manager em SC_DamageReceiver
- Atribuir a instância Player a uma variável Player em SC_EnemySpawner
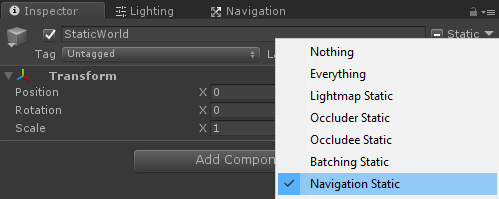
E, por último, temos que assar o NavMesh em nossa cena para que a IA inimiga possa navegar.
Além disso, não se esqueça de marcar todos os objetos estáticos na cena como navegação estática antes de criar o NavMesh:
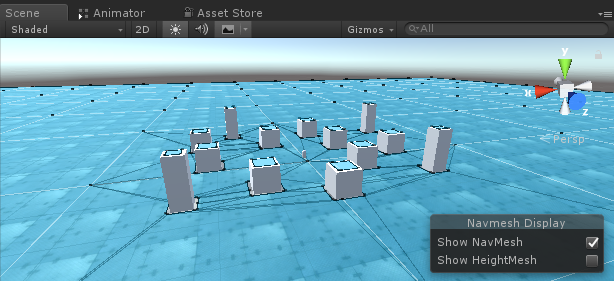
- Vá para a janela NavMesh (Janela -> AI -> Navegação), clique na guia Bake e clique no botão Bake. Depois que o NavMesh estiver pronto, ele deve ficar mais ou menos assim:
Agora é hora de apertar o Play e testar:
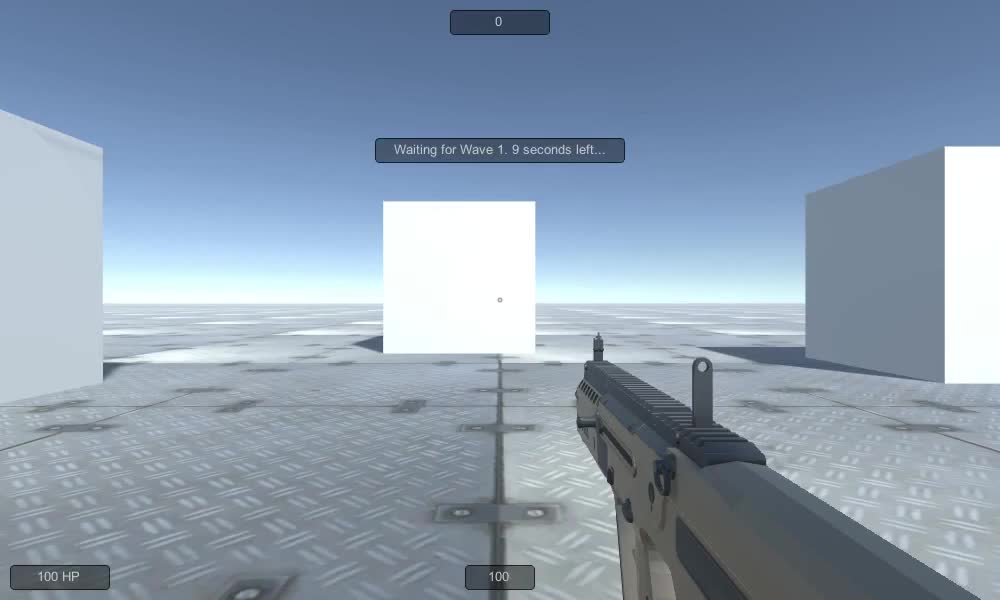
Tudo funciona como esperado!