Unity Como fazer controles de toque móveis
Os controles são uma das partes mais importantes de um videogame e, sem surpresa, é o que permite aos jogadores interagir com o mundo do jogo.
Os controles do jogo são sinais enviados através da interação do hardware (mouse/teclado, controle, touchscreen, etc.) que são então processados pelo código do jogo, aplicando determinadas ações.
PCs e Consoles de jogos possuem botões físicos que podem ser pressionados, porém, os dispositivos móveis modernos possuem apenas alguns botões físicos, o restante da interação é feito através de gestos de toque, o que significa que os botões do jogo precisam ser exibidos na tela. É por isso que, ao criar um jogo para celular, é importante encontrar um equilíbrio entre ter todos os botões na tela e mantê-lo fácil de usar e organizado.
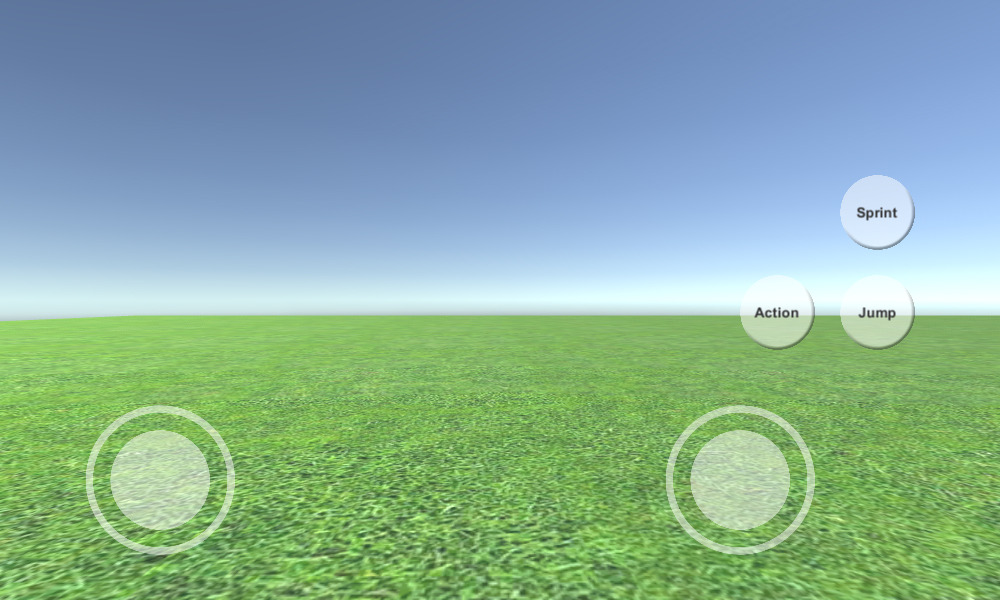
Neste tutorial, mostrarei como criar controles móveis completos (joysticks e botões) em Unity usando UI Canvas.
Etapa 1: crie todos os scripts necessários
Este tutorial apresenta 2 scripts, SC_ClickTracker.cs e SC_MobileControls.cs. O primeiro script ouvirá os eventos de clique e o segundo script lerá os valores gerados a partir dos eventos.
SC_ClickTracker.cs
using System.Collections;
using System.Collections.Generic;
using UnityEngine;
using UnityEngine.EventSystems;

#if UNITY_EDITOR
using UnityEditor;
#endif

public class SC_ClickTracker : MonoBehaviour, IPointerDownHandler, IDragHandler, IPointerUpHandler
{
    public string buttonName = ""; //This should be an unique name of the button
    public bool isJoystick = false;
    public float movementLimit = 1; //How far the joystick can be moved (n x Joystick Width)
    public float movementThreshold = 0.1f; //Minimum distance (n x Joystick Width) that the Joystick need to be moved to trigger inputAxis (Must be less than movementLimit)

    //Reference variables
    RectTransform rt;
    Vector3 startPos;
    Vector2 clickPos;

    //Input variables
    Vector2 inputAxis = Vector2.zero;
    bool holding = false;
    bool clicked = false;

    void Start()
    {
        //Add this button to the list
        SC_MobileControls.instance.AddButton(this);

        rt = GetComponent<RectTransform>();
        startPos = rt.anchoredPosition3D;
    }

    //Do this when the mouse is clicked over the selectable object this script is attached to.
    public void OnPointerDown(PointerEventData eventData)
    {
        //Debug.Log(this.gameObject.name + " Was Clicked.");

        holding = true;

        if (!isJoystick)
        {
            clicked = true;
            StartCoroutine(StopClickEvent());
        }
        else
        {
            //Initialize Joystick movement
            clickPos = eventData.pressPosition;
        }
    }

    WaitForEndOfFrame waitForEndOfFrame = new WaitForEndOfFrame();

    //Wait for next update then release the click event
    IEnumerator StopClickEvent()
    {
        yield return waitForEndOfFrame;

        clicked = false;
    }

    //Joystick movement
    public void OnDrag(PointerEventData eventData)
    {
        //Debug.Log(this.gameObject.name + " The element is being dragged");

        if (isJoystick)
        {
            Vector3 movementVector = Vector3.ClampMagnitude((eventData.position - clickPos) / SC_MobileControls.instance.canvas.scaleFactor, (rt.sizeDelta.x * movementLimit) + (rt.sizeDelta.x * movementThreshold));
            Vector3 movePos = startPos + movementVector;
            rt.anchoredPosition = movePos;

            //Update inputAxis
            float inputX = 0;
            float inputY = 0;
            if (Mathf.Abs(movementVector.x) > rt.sizeDelta.x * movementThreshold)
            {
                inputX = (movementVector.x - (rt.sizeDelta.x * movementThreshold * (movementVector.x > 0 ? 1 : -1))) / (rt.sizeDelta.x * movementLimit);
            }
            if (Mathf.Abs(movementVector.y) > rt.sizeDelta.x * movementThreshold)
            {
                inputY = (movementVector.y - (rt.sizeDelta.x * movementThreshold * (movementVector.y > 0 ? 1 : -1))) / (rt.sizeDelta.x * movementLimit);
            }
            inputAxis = new Vector2(inputX, inputY);
        }
    }

    //Do this when the mouse click on this selectable UI object is released.
    public void OnPointerUp(PointerEventData eventData)
    {
        //Debug.Log(this.gameObject.name + " The mouse click was released");

        holding = false;

        if (isJoystick)
        {
            //Reset Joystick position
            rt.anchoredPosition = startPos;
            inputAxis = Vector2.zero;
        }
    }

    public Vector2 GetInputAxis()
    {
        return inputAxis;
    }

    public bool GetClickedStatus()
    {
        return clicked;
    }

    public bool GetHoldStatus()
    {
        return holding;
    }
}

#if UNITY_EDITOR
//Custom Editor
[CustomEditor(typeof(SC_ClickTracker))]
public class SC_ClickTracker_Editor : Editor
{
    public override void OnInspectorGUI()
    {
        SC_ClickTracker script = (SC_ClickTracker)target;

        script.buttonName = EditorGUILayout.TextField("Button Name", script.buttonName);
        script.isJoystick = EditorGUILayout.Toggle("Is Joystick", script.isJoystick);
        if (script.isJoystick)
        {
            script.movementLimit = EditorGUILayout.FloatField("Movement Limit", script.movementLimit);
            script.movementThreshold = EditorGUILayout.FloatField("Movement Threshold", script.movementThreshold);
        }
    }
}
#endif
SC_MobileControls.cs
using System.Collections;
using System.Collections.Generic;
using UnityEngine;

public class SC_MobileControls : MonoBehaviour
{
    [HideInInspector]
    public Canvas canvas;
    List<SC_ClickTracker> buttons = new List<SC_ClickTracker>();

    public static SC_MobileControls instance;

    void Awake()
    {
        //Assign this script to static variable, so it can be accessed from other scripts. Make sure there is only one SC_MobileControls in the Scene.
        instance = this;

        canvas = GetComponent<Canvas>();
    }

    public int AddButton(SC_ClickTracker button)
    {
        buttons.Add(button);

        return buttons.Count - 1;
    }

    public Vector2 GetJoystick(string joystickName)
    {
        for(int i = 0; i < buttons.Count; i++)
        {
            if(buttons[i].buttonName == joystickName)
            {
                return buttons[i].GetInputAxis();
            }
        }

        Debug.LogError("Joystick with a name '" + joystickName + "' not found. Make sure SC_ClickTracker is assigned to the button and the name is matching.");

        return Vector2.zero;
    }

    public bool GetMobileButton(string buttonName)
    {
        for (int i = 0; i < buttons.Count; i++)
        {
            if (buttons[i].buttonName == buttonName)
            {
                return buttons[i].GetHoldStatus();
            }
        }

        Debug.LogError("Button with a name '" + buttonName + "' not found. Make sure SC_ClickTracker is assigned to the button and the name is matching.");

        return false;
    }

    public bool GetMobileButtonDown(string buttonName)
    {
        for (int i = 0; i < buttons.Count; i++)
        {
            if (buttons[i].buttonName == buttonName)
            {
                return buttons[i].GetClickedStatus();
            }
        }

        Debug.LogError("Button with a name '" + buttonName + "' not found. Make sure SC_ClickTracker is assigned to the button and the name is matching.");

        return false;
    }
}
Etapa 2: configurar controles móveis
- Crie um novo Canvas (GameObject -> UI -> Canvas)
- Altere 'UI Scale Mode' no Canvas Scaler para 'Scale With Screen Size' e altere a Resolução de Referência para aquela com a qual você está trabalhando (no meu caso é 1000 x 600)
- Anexe o script SC_MobileControls ao objeto Canvas
- Clique com o botão direito em Objeto Canvas -> UI -> Imagem
- Renomeie a imagem recém-criada para "JoystickLeft"
- Mude o Sprite "JoystickLeft" para um círculo vazio (não se esqueça de mudar o Tipo de Textura para 'Sprite (2D and UI)' após importá-lo para Unity)

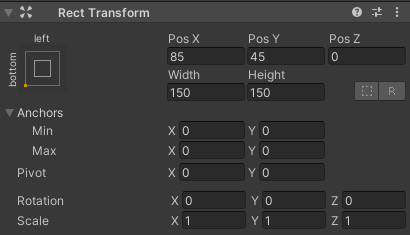
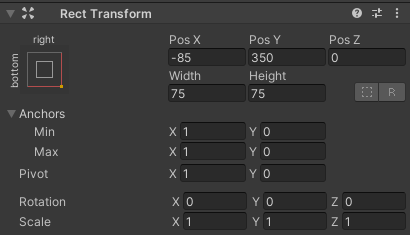
- Defina os valores de "JoystickLeft" Rect Transform iguais aos da captura de tela abaixo:
- No componente Imagem, defina Color alpha como 0,5 para tornar o sprite ligeiramente transparente:
- Duplique o objeto "JoystickLeft" e renomeie-o para "JoystickLeftButton"
- Mova "JoystickLeftButton" dentro do objeto "JoystickLeft"
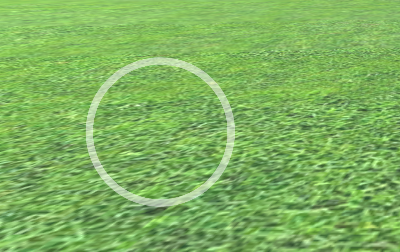
- Mude o Sprite "JoystickLeftButton" para um círculo preenchido:

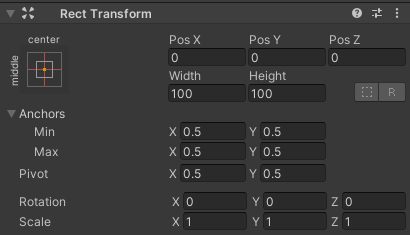
- Defina os valores "JoystickLeftButton" Rect Transform iguais aos da captura de tela abaixo:
- Adicionar componente de botão a "JoystickLeftButton"
- No componente Button, altere Transição para 'None'
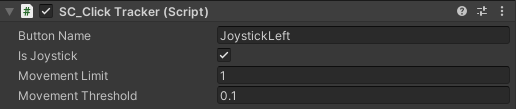
- Anexe o script SC_ClickTracker ao "JoystickLeftButton"
- Em SC_ClickTracker defina o nome do botão para qualquer nome exclusivo (no meu caso eu configurei para 'JoystickLeft') e habilite a caixa de seleção 'Is Joystick'.
O botão Joystick está pronto. Você pode ter qualquer número de Joysticks (no meu caso terei 2, um à esquerda para controlar o movimento e outro à direita para controlar a rotação).
- Duplique "JoystickLeft" e renomeie-o para "JoystickRight"
- Expanda "JoystickRight" e renomeie "JoystickLeftButton" para "JoystickRightButton"
- Defina os valores "JoystickRight" Rect Transform iguais aos da captura de tela abaixo:

- Selecione o objeto "JoystickRightButton" e em SC_ClickTracker altere o nome do botão para 'JoystickRight'
O segundo Joystick está pronto.
Agora vamos criar um botão normal:
- Clique com o botão direito em Canvas Object -> UI -> Button
- Renomear objeto de botão para "SprintButton"
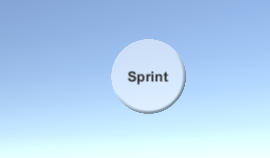
- Mude o Sprite "SprintButton" para um Círculo com efeito chanfrado:

- Defina os valores "SprintButton" Rect Transform iguais aos da captura de tela abaixo:
- Altere o alfa da cor da imagem "SprintButton" para 0,5
- Anexe o script SC_ClickTracker ao objeto "SprintButton"
- Em SC_ClickTracker altere o nome do botão para 'Sprinting'
- Selecione Objeto de Texto dentro de "SprintButton" e altere seu texto para 'Sprint', altere também o Tamanho da Fonte para 'Bold'
O botão está pronto.
Vamos criar outro botão chamado "Jump":
- Duplique o objeto "SprintButton" e renomeie-o para "JumpButton"
- Altere o valor "JumpButton" Pos Y para 250
- Em SC_ClickTracker altere o nome do botão para 'Jumping'
- Altere o texto dentro de "JumpButton" para 'Jump'
E o último botão é "Action":
- Duplique o objeto "JumpButton" e renomeie-o para "ActionButton"
- Altere o valor "ActionButton" Pos X para -185
- Em SC_ClickTracker altere o nome do botão para 'Action'
- Altere o texto dentro de "ActionButton" para 'Action'
Etapa 3: implementar controles móveis
Se você seguiu as etapas acima, agora você pode usar estas funções para implementar os controles móveis em seu script:
if(SC_MobileControls.instance.GetMobileButtonDown("BUTTON_NAME")){
	//Mobile button has been pressed one time, equivalent to if(Input.GetKeyDown(KeyCode...))
}

if(SC_MobileControls.instance.GetMobileButton("BUTTON_NAME")){
	//Mobile button is being held pressed, equivalent to if(Input.GetKey(KeyCode...))
}

//Get normalized direction of a on-screen Joystick
//Could be compared to: new Vector2(Input.GetAxis("Horizontal"), Input.GetAxis("Vertical")) or new Vector2(Input.GetAxis("Mouse X"), Input.GetAxis("Mouse Y"))
Vector2 inputAxis = SC_MobileControls.instance.GetJoystick("JOYSTICK_NAME");
Por exemplo, implementarei controles móveis com um controlador FPS a partir de este tutorial. Siga esse tutorial primeiro, é bastante simples.
Se você seguisse esse tutorial, agora você teria o objeto "FPSPlayer" junto com o Canvas com controles móveis.
Preservaremos os controles do desktop e ao mesmo tempo implementaremos os controles móveis, tornando-os multiplataforma:
- Abra o script SC_FPSController, role até a linha 28 e remova esta parte (remover essa parte evitará que o cursor seja bloqueado e permitirá clicar nos controles móveis no Editor.):
        // Lock cursor
        Cursor.lockState = CursorLockMode.Locked;
Cursor.visible = false;- Role até a linha 39 e substitua:
        bool isRunning = Input.GetKey(KeyCode.LeftShift);
        float curSpeedX = canMove ? (isRunning ? runningSpeed : walkingSpeed) * Input.GetAxis("Vertical") : 0;
float curSpeedY = canMove ? (isRunning ? runningSpeed : walkingSpeed) * Input.GetAxis("Horizontal") : 0;- Com:
        bool isRunning = Input.GetKey(KeyCode.LeftShift) || SC_MobileControls.instance.GetMobileButton("Sprinting");
        float curSpeedX = canMove ? (isRunning ? runningSpeed : walkingSpeed) * (Input.GetAxis("Vertical") + SC_MobileControls.instance.GetJoystick("JoystickLeft").y) : 0;
float curSpeedY = canMove ? (isRunning ? runningSpeed : walkingSpeed) * (Input.GetAxis("Horizontal") + SC_MobileControls.instance.GetJoystick("JoystickLeft").x) : 0;- Role para baixo até a linha 45 e substitua:
if (Input.GetButton("Jump") && canMove && characterController.isGrounded)- Com:
if ((Input.GetButton("Jump") || SC_MobileControls.instance.GetMobileButtonDown("Jumping")) && canMove && characterController.isGrounded)- Role para baixo até a linha 68 e substitua:
            rotationX += -Input.GetAxis("Mouse Y") * lookSpeed;
            rotationX = Mathf.Clamp(rotationX, -lookXLimit, lookXLimit);
            playerCamera.transform.localRotation = Quaternion.Euler(rotationX, 0, 0);
transform.rotation *= Quaternion.Euler(0, Input.GetAxis("Mouse X") * lookSpeed, 0);- Com:
#if UNITY_IPHONE || UNITY_ANDROID || UNITY_EDITOR
            rotationX += -(SC_MobileControls.instance.GetJoystick("JoystickRight").y) * lookSpeed;
#else
            rotationX += -Input.GetAxis("Mouse Y") * lookSpeed;
#endif
            rotationX = Mathf.Clamp(rotationX, -lookXLimit, lookXLimit);
            playerCamera.transform.localRotation = Quaternion.Euler(rotationX, 0, 0);
#if UNITY_IPHONE || UNITY_ANDROID || UNITY_EDITOR
            transform.rotation *= Quaternion.Euler(0, SC_MobileControls.instance.GetJoystick("JoystickRight").x * lookSpeed, 0);
#else
            transform.rotation *= Quaternion.Euler(0, Input.GetAxis("Mouse X") * lookSpeed, 0);
#endif
Como o movimento da aparência irá interferir no teste do joystick no Editor, estamos usando #if para compilação específica da plataforma para separar a lógica móvel do resto das plataformas.
O Mobile FPS Controller já está pronto, vamos testá-lo:

Como você pode ver, todos os Joysticks e Botões estão funcionais (exceto o botão "Action", que não foi implementado por não possuir um recurso adequado para ele).