Faça um jogo de carros multijogador com PUN 2
Fazer um jogo multiplayer em Unity é uma tarefa complexa, mas felizmente diversas soluções simplificam o processo de desenvolvimento.
Uma dessas soluções é a Photon Network. Especificamente, a versão mais recente de sua API, chamada PUN 2, cuida da hospedagem do servidor e deixa você livre para criar um jogo multijogador da maneira que desejar.
Neste tutorial, mostrarei como criar um jogo de carro simples com sincronização física usando PUN 2.
Unity versão usada neste tutorial: Unity 2018.3.0f2 (64 bits)
Parte 1: Configurando o PUN 2
O primeiro passo é baixar um pacote PUN 2 do Asset Store. Ele contém todos os scripts e arquivos necessários para integração multijogador.
- Abra seu projeto Unity e vá para Asset Store: (Janela -> Geral -> AssetStore) ou pressione Ctrl+9
- Procure por "PUN 2- Free" e clique no primeiro resultado ou clique aqui
- Importe o pacote PUN 2 após a conclusão do download


- Após a importação do pacote você precisa criar um Photon App ID, isso é feito no site deles: https://www.photonengine.com/
- Crie uma nova conta (ou faça login na sua conta existente)
- Vá para a página de aplicativos clicando no ícone do perfil e em "Your Applications" ou siga este link: https://dashboard.photonengine.com/en-US/PublicCloud
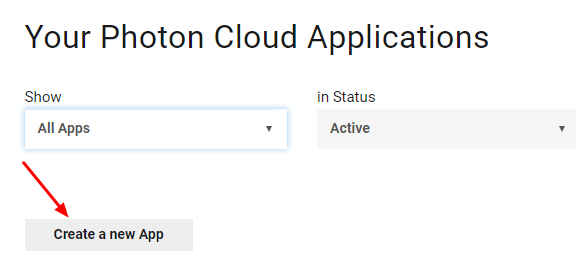
- Na página Aplicativos, clique em "Create new app"
- Na página de criação, para Tipo de fóton selecione "Photon Realtime" e para Nome, digite qualquer nome e clique "Create"
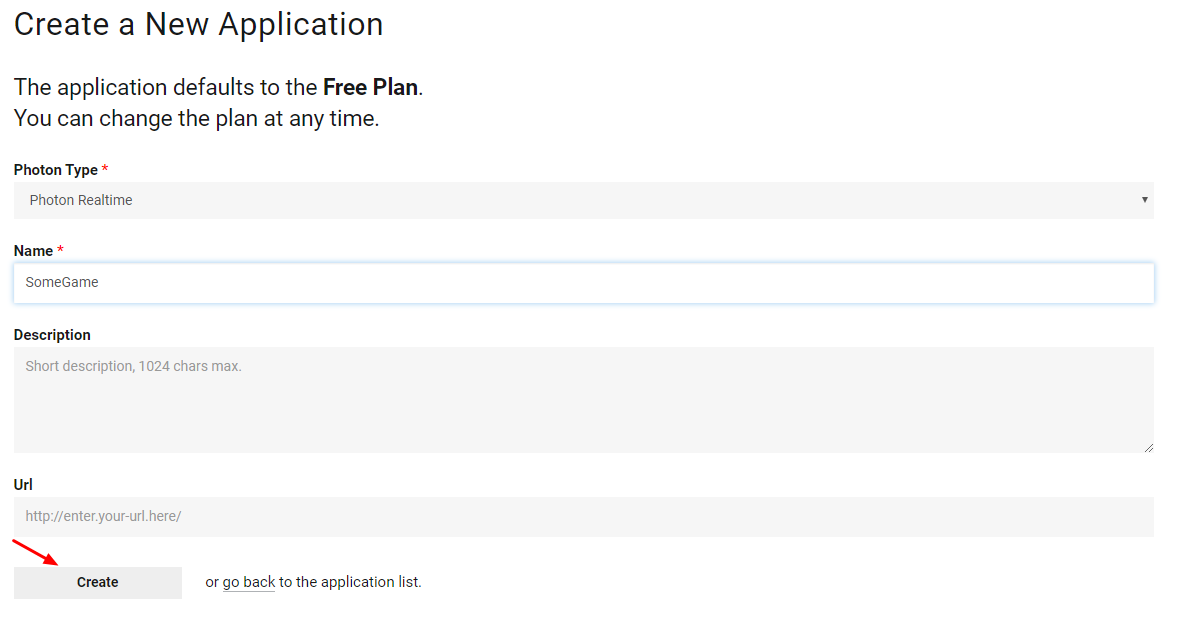
Como você pode ver, o padrão do aplicativo é o plano Gratuito. Você pode ler mais sobre os planos de preços aqui
- Depois que o aplicativo for criado, copie o ID do aplicativo localizado sob o nome do aplicativo

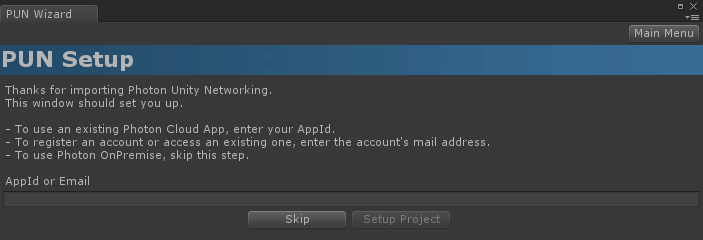
- Volte para o seu projeto Unity e vá para Janela -> Photon Unity Networking -> PUN Wizard
- No PUN Wizard, clique em "Setup Project", cole seu ID do aplicativo e clique em "Setup Project"
O PUN 2 já está pronto!
Parte 2: Criando um jogo de carros multijogador
1. Configurando um lobby
Vamos começar criando uma cena do Lobby que conterá a lógica do Lobby (Navegar pelas salas existentes, criar novas salas, etc.):
- Crie uma nova cena e chame-a "GameLobby"
- Na cena "GameLobby" crie um novo GameObject e chame-o "_GameLobby"
- Crie um novo script C# e chame-o de "PUN2_GameLobby" e anexe-o ao objeto "_GameLobby"
- Cole o código abaixo dentro do script "PUN2_GameLobby"
PUN2_GameLobby.cs
using System.Collections.Generic;
using UnityEngine;
using Photon.Pun;
using Photon.Realtime;
public class PUN2_GameLobby : MonoBehaviourPunCallbacks
{
//Our player name
string playerName = "Player 1";
//Users are separated from each other by gameversion (which allows you to make breaking changes).
string gameVersion = "1.0";
//The list of created rooms
List<RoomInfo> createdRooms = new List<RoomInfo>();
//Use this name when creating a Room
string roomName = "Room 1";
Vector2 roomListScroll = Vector2.zero;
bool joiningRoom = false;
// Use this for initialization
void Start()
{
//Initialize Player name
playerName = "Player " + Random.Range(111, 999);
//This makes sure we can use PhotonNetwork.LoadLevel() on the master client and all clients in the same room sync their level automatically
PhotonNetwork.AutomaticallySyncScene = true;
if (!PhotonNetwork.IsConnected)
{
//Set the App version before connecting
PhotonNetwork.PhotonServerSettings.AppSettings.AppVersion = gameVersion;
PhotonNetwork.PhotonServerSettings.AppSettings.FixedRegion = "eu";
// Connect to the photon master-server. We use the settings saved in PhotonServerSettings (a .asset file in this project)
PhotonNetwork.ConnectUsingSettings();
}
}
public override void OnDisconnected(DisconnectCause cause)
{
Debug.Log("OnFailedToConnectToPhoton. StatusCode: " + cause.ToString() + " ServerAddress: " + PhotonNetwork.ServerAddress);
}
public override void OnConnectedToMaster()
{
Debug.Log("OnConnectedToMaster");
//After we connected to Master server, join the Lobby
PhotonNetwork.JoinLobby(TypedLobby.Default);
}
public override void OnRoomListUpdate(List<RoomInfo> roomList)
{
Debug.Log("We have received the Room list");
//After this callback, update the room list
createdRooms = roomList;
}
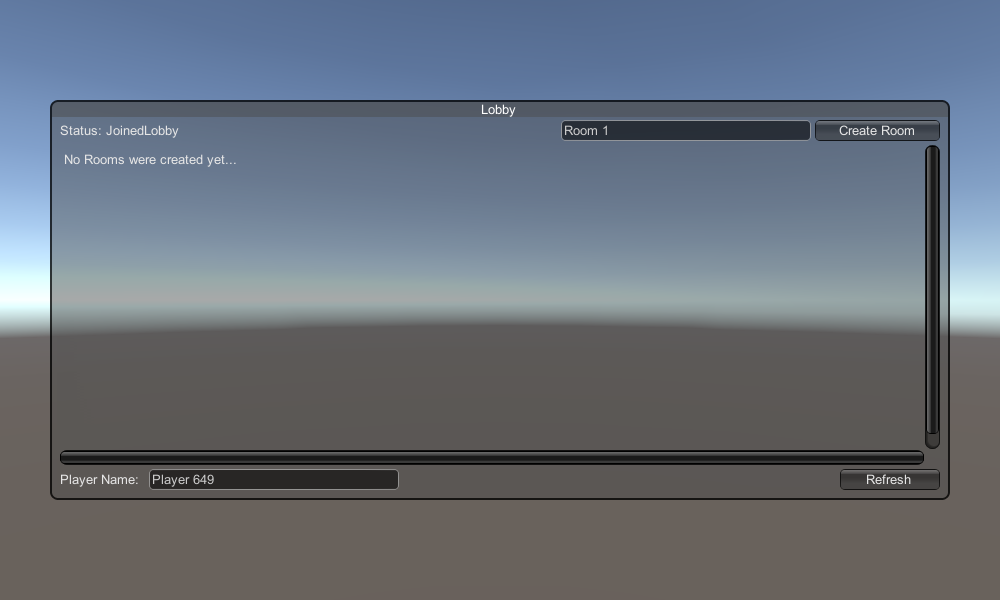
void OnGUI()
{
GUI.Window(0, new Rect(Screen.width / 2 - 450, Screen.height / 2 - 200, 900, 400), LobbyWindow, "Lobby");
}
void LobbyWindow(int index)
{
//Connection Status and Room creation Button
GUILayout.BeginHorizontal();
GUILayout.Label("Status: " + PhotonNetwork.NetworkClientState);
if (joiningRoom || !PhotonNetwork.IsConnected || PhotonNetwork.NetworkClientState != ClientState.JoinedLobby)
{
GUI.enabled = false;
}
GUILayout.FlexibleSpace();
//Room name text field
roomName = GUILayout.TextField(roomName, GUILayout.Width(250));
if (GUILayout.Button("Create Room", GUILayout.Width(125)))
{
if (roomName != "")
{
joiningRoom = true;
RoomOptions roomOptions = new RoomOptions();
roomOptions.IsOpen = true;
roomOptions.IsVisible = true;
roomOptions.MaxPlayers = (byte)10; //Set any number
PhotonNetwork.JoinOrCreateRoom(roomName, roomOptions, TypedLobby.Default);
}
}
GUILayout.EndHorizontal();
//Scroll through available rooms
roomListScroll = GUILayout.BeginScrollView(roomListScroll, true, true);
if (createdRooms.Count == 0)
{
GUILayout.Label("No Rooms were created yet...");
}
else
{
for (int i = 0; i < createdRooms.Count; i++)
{
GUILayout.BeginHorizontal("box");
GUILayout.Label(createdRooms[i].Name, GUILayout.Width(400));
GUILayout.Label(createdRooms[i].PlayerCount + "/" + createdRooms[i].MaxPlayers);
GUILayout.FlexibleSpace();
if (GUILayout.Button("Join Room"))
{
joiningRoom = true;
//Set our Player name
PhotonNetwork.NickName = playerName;
//Join the Room
PhotonNetwork.JoinRoom(createdRooms[i].Name);
}
GUILayout.EndHorizontal();
}
}
GUILayout.EndScrollView();
//Set player name and Refresh Room button
GUILayout.BeginHorizontal();
GUILayout.Label("Player Name: ", GUILayout.Width(85));
//Player name text field
playerName = GUILayout.TextField(playerName, GUILayout.Width(250));
GUILayout.FlexibleSpace();
GUI.enabled = (PhotonNetwork.NetworkClientState == ClientState.JoinedLobby || PhotonNetwork.NetworkClientState == ClientState.Disconnected) && !joiningRoom;
if (GUILayout.Button("Refresh", GUILayout.Width(100)))
{
if (PhotonNetwork.IsConnected)
{
//Re-join Lobby to get the latest Room list
PhotonNetwork.JoinLobby(TypedLobby.Default);
}
else
{
//We are not connected, estabilish a new connection
PhotonNetwork.ConnectUsingSettings();
}
}
GUILayout.EndHorizontal();
if (joiningRoom)
{
GUI.enabled = true;
GUI.Label(new Rect(900 / 2 - 50, 400 / 2 - 10, 100, 20), "Connecting...");
}
}
public override void OnCreateRoomFailed(short returnCode, string message)
{
Debug.Log("OnCreateRoomFailed got called. This can happen if the room exists (even if not visible). Try another room name.");
joiningRoom = false;
}
public override void OnJoinRoomFailed(short returnCode, string message)
{
Debug.Log("OnJoinRoomFailed got called. This can happen if the room is not existing or full or closed.");
joiningRoom = false;
}
public override void OnJoinRandomFailed(short returnCode, string message)
{
Debug.Log("OnJoinRandomFailed got called. This can happen if the room is not existing or full or closed.");
joiningRoom = false;
}
public override void OnCreatedRoom()
{
Debug.Log("OnCreatedRoom");
//Set our player name
PhotonNetwork.NickName = playerName;
//Load the Scene called Playground (Make sure it's added to build settings)
PhotonNetwork.LoadLevel("Playground");
}
public override void OnJoinedRoom()
{
Debug.Log("OnJoinedRoom");
}
}
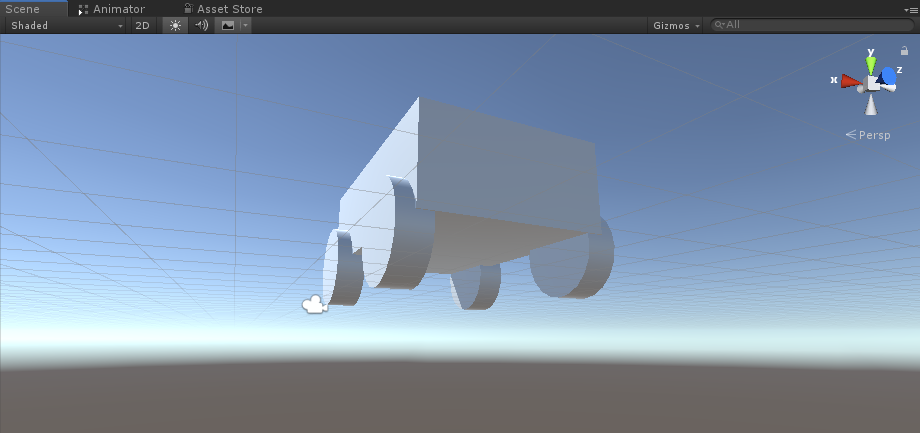
2. Criando um carro pré-fabricado
O carro pré-fabricado usará um controlador de física simples.
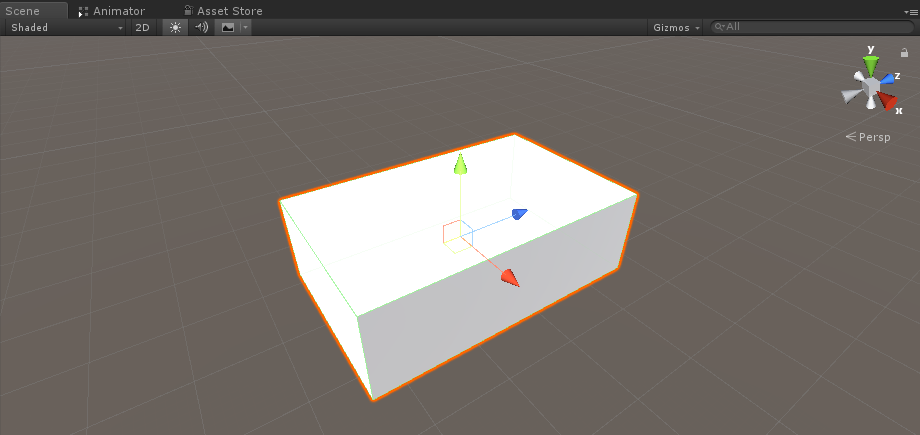
- Crie um novo GameObject e chame-o "CarRoot"
- Crie um novo cubo e mova-o dentro do objeto "CarRoot" e depois aumente-o ao longo dos eixos Z e X
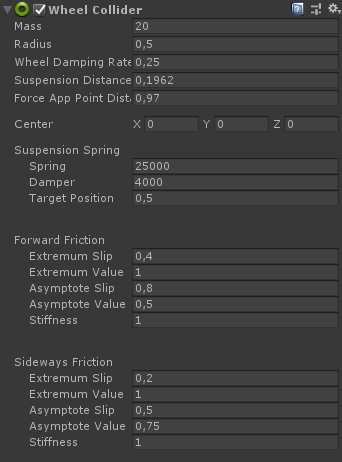
- Crie um novo GameObject e nomeie-o "wfl" (abreviatura de Wheel Front Left)
- Adicione o componente Wheel Collider ao objeto "wfl" e defina os valores da imagem abaixo:
- Crie um novo GameObject, renomeie-o para "WheelTransform" e mova-o para dentro do objeto "wfl"
- Crie um novo Cilindro, mova-o dentro do objeto "WheelTransform" e gire-o e reduza-o até que corresponda às dimensões do Wheel Collider. No meu caso, a escala é (1, 0,17, 1)
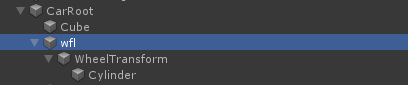

- Finalmente, duplique o objeto "wfl" 3 vezes para o resto das rodas e renomeie cada objeto para "wfr" (Roda Dianteira Direita), "wrr" (Roda Traseira Direita) e "wrl" (Roda Traseira Esquerda) respectivamente
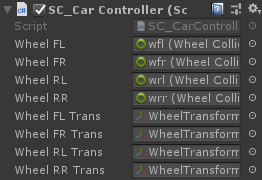
- Crie um novo script, chame-o de "SC_CarController" e cole o código abaixo dentro dele:
SC_CarController.cs
using UnityEngine;
using System.Collections;

public class SC_CarController : MonoBehaviour
{
    public WheelCollider WheelFL;
    public WheelCollider WheelFR;
    public WheelCollider WheelRL;
    public WheelCollider WheelRR;
    public Transform WheelFLTrans;
    public Transform WheelFRTrans;
    public Transform WheelRLTrans;
    public Transform WheelRRTrans;
    public float steeringAngle = 45;
    public float maxTorque = 1000;
    public  float maxBrakeTorque = 500;
    public Transform centerOfMass;

    float gravity = 9.8f;
    bool braked = false;
    Rigidbody rb;

    void Start()
    {
        rb = GetComponent<Rigidbody>();
        rb.centerOfMass = centerOfMass.transform.localPosition;
    }

    void FixedUpdate()
    {
        if (!braked)
        {
            WheelFL.brakeTorque = 0;
            WheelFR.brakeTorque = 0;
            WheelRL.brakeTorque = 0;
            WheelRR.brakeTorque = 0;
        }
        //Speed of car, Car will move as you will provide the input to it.

        WheelRR.motorTorque = maxTorque * Input.GetAxis("Vertical");
        WheelRL.motorTorque = maxTorque * Input.GetAxis("Vertical");

        //Changing car direction
        //Here we are changing the steer angle of the front tyres of the car so that we can change the car direction.
        WheelFL.steerAngle = steeringAngle * Input.GetAxis("Horizontal");
        WheelFR.steerAngle = steeringAngle * Input.GetAxis("Horizontal");
    }
    void Update()
    {
        HandBrake();

        //For tyre rotate
        WheelFLTrans.Rotate(WheelFL.rpm / 60 * 360 * Time.deltaTime, 0, 0);
        WheelFRTrans.Rotate(WheelFR.rpm / 60 * 360 * Time.deltaTime, 0, 0);
        WheelRLTrans.Rotate(WheelRL.rpm / 60 * 360 * Time.deltaTime, 0, 0);
        WheelRRTrans.Rotate(WheelRL.rpm / 60 * 360 * Time.deltaTime, 0, 0);
        //Changing tyre direction
        Vector3 temp = WheelFLTrans.localEulerAngles;
        Vector3 temp1 = WheelFRTrans.localEulerAngles;
        temp.y = WheelFL.steerAngle - (WheelFLTrans.localEulerAngles.z);
        WheelFLTrans.localEulerAngles = temp;
        temp1.y = WheelFR.steerAngle - WheelFRTrans.localEulerAngles.z;
        WheelFRTrans.localEulerAngles = temp1;
    }
    void HandBrake()
    {
        //Debug.Log("brakes " + braked);
        if (Input.GetButton("Jump"))
        {
            braked = true;
        }
        else
        {
            braked = false;
        }
        if (braked)
        {

            WheelRL.brakeTorque = maxBrakeTorque * 20;//0000;
            WheelRR.brakeTorque = maxBrakeTorque * 20;//0000;
            WheelRL.motorTorque = 0;
            WheelRR.motorTorque = 0;
        }
    }
}- Anexe o script SC_CarController ao objeto "CarRoot"
- Anexe o componente Rigidbody ao objeto "CarRoot" e altere sua massa para 1000
- Atribua as variáveis de roda em SC_CarController (Wheel collider para as primeiras 4 variáveis e WheelTransform para o restante das 4)
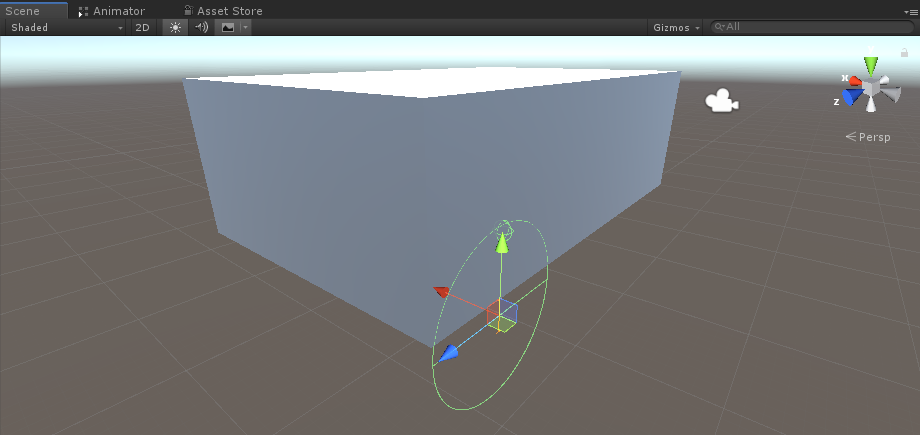
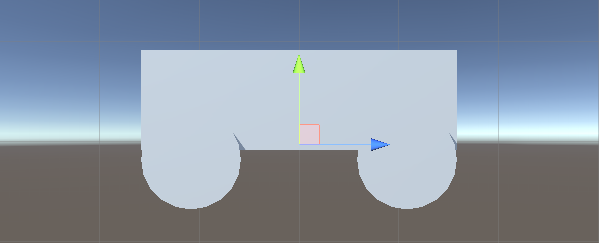
- Para a variável Centro de Massa crie um novo GameObject, chame-o de "CenterOfMass" e mova-o para dentro do objeto "CarRoot"
- Coloque o objeto "CenterOfMass" no meio e ligeiramente para baixo, assim:
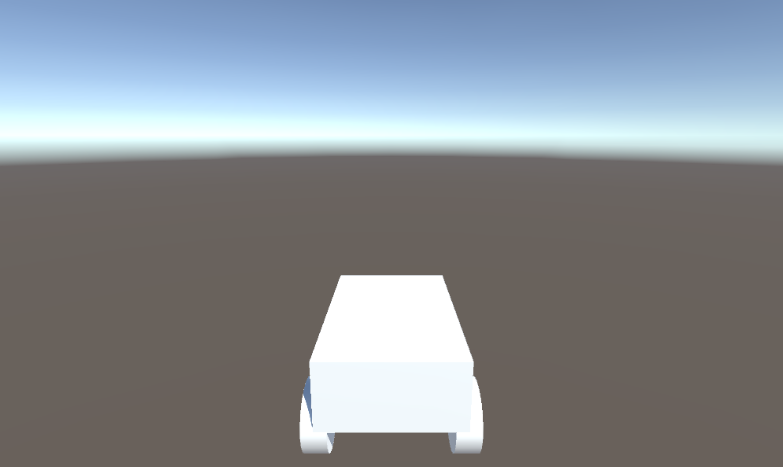
- Finalmente, para fins de teste, mova a câmera principal para dentro do objeto "CarRoot" e aponte-a para o carro:
- Crie um novo script, chame-o de "PUN2_CarSync" e cole o código abaixo dentro dele:
PUN2_CarSync.cs
using System.Collections;
using System.Collections.Generic;
using UnityEngine;
using Photon.Pun;

public class PUN2_CarSync : MonoBehaviourPun, IPunObservable
{
    public MonoBehaviour[] localScripts; //Scripts that should only be enabled for the local player (Ex. Car controller)
    public GameObject[] localObjects; //Objects that should only be active for the local player (Ex. Camera)
    public Transform[] wheels; //Car wheel transforms

    Rigidbody r;
    // Values that will be synced over network
    Vector3 latestPos;
    Quaternion latestRot;
    Vector3 latestVelocity;
    Vector3 latestAngularVelocity;
    Quaternion[] wheelRotations = new Quaternion[0];
    // Lag compensation
    float currentTime = 0;
    double currentPacketTime = 0;
    double lastPacketTime = 0;
    Vector3 positionAtLastPacket = Vector3.zero;
    Quaternion rotationAtLastPacket = Quaternion.identity;
    Vector3 velocityAtLastPacket = Vector3.zero;
    Vector3 angularVelocityAtLastPacket = Vector3.zero;

    // Use this for initialization
    void Awake()
    {
        r = GetComponent<Rigidbody>();
        r.isKinematic = !photonView.IsMine;
        for (int i = 0; i < localScripts.Length; i++)
        {
            localScripts[i].enabled = photonView.IsMine;
        }
        for (int i = 0; i < localObjects.Length; i++)
        {
            localObjects[i].SetActive(photonView.IsMine);
        }
    }

    public void OnPhotonSerializeView(PhotonStream stream, PhotonMessageInfo info)
    {
        if (stream.IsWriting)
        {
            // We own this player: send the others our data
            stream.SendNext(transform.position);
            stream.SendNext(transform.rotation);
            stream.SendNext(r.velocity);
            stream.SendNext(r.angularVelocity);

            wheelRotations = new Quaternion[wheels.Length];
            for(int i = 0; i < wheels.Length; i++)
            {
                wheelRotations[i] = wheels[i].localRotation;
            }
            stream.SendNext(wheelRotations);
        }
        else
        {
            // Network player, receive data
            latestPos = (Vector3)stream.ReceiveNext();
            latestRot = (Quaternion)stream.ReceiveNext();
            latestVelocity = (Vector3)stream.ReceiveNext();
            latestAngularVelocity = (Vector3)stream.ReceiveNext();
            wheelRotations = (Quaternion[])stream.ReceiveNext();

            // Lag compensation
            currentTime = 0.0f;
            lastPacketTime = currentPacketTime;
            currentPacketTime = info.SentServerTime;
            positionAtLastPacket = transform.position;
            rotationAtLastPacket = transform.rotation;
            velocityAtLastPacket = r.velocity;
            angularVelocityAtLastPacket = r.angularVelocity;
        }
    }

    // Update is called once per frame
    void Update()
    {
        if (!photonView.IsMine)
        {
            // Lag compensation
            double timeToReachGoal = currentPacketTime - lastPacketTime;
            currentTime += Time.deltaTime;

            // Update car position and velocity
            transform.position = Vector3.Lerp(positionAtLastPacket, latestPos, (float)(currentTime / timeToReachGoal));
            transform.rotation = Quaternion.Lerp(rotationAtLastPacket, latestRot, (float)(currentTime / timeToReachGoal));
            r.velocity = Vector3.Lerp(velocityAtLastPacket, latestVelocity, (float)(currentTime / timeToReachGoal));
            r.angularVelocity = Vector3.Lerp(angularVelocityAtLastPacket, latestAngularVelocity, (float)(currentTime / timeToReachGoal));

            //Apply wheel rotation
            if(wheelRotations.Length == wheels.Length)
            {
                for (int i = 0; i < wheelRotations.Length; i++)
                {
                    wheels[i].localRotation = Quaternion.Lerp(wheels[i].localRotation, wheelRotations[i], Time.deltaTime * 6.5f);
                }
            }
        }
    }
}- Anexe o script PUN2_CarSync ao objeto "CarRoot"
- Anexe o componente PhotonView ao objeto "CarRoot"
- Em PUN2_CarSync atribua o script SC_CarController ao array Local Scripts
- Em PUN2_CarSync atribua câmera à matriz de objetos locais
- Atribuir objetos WheelTransform à matriz Wheels
- Por fim, atribua o script PUN2_CarSync à matriz de componentes observados no Photon View
- Salve o objeto "CarRoot" no Prefab e coloque-o em uma pasta chamada Resources (isso é necessário para poder gerar objetos pela rede)
3. Criando um nível de jogo
Nível de Jogo é uma Cena que é carregada após entrar na Sala, onde toda a ação acontece.
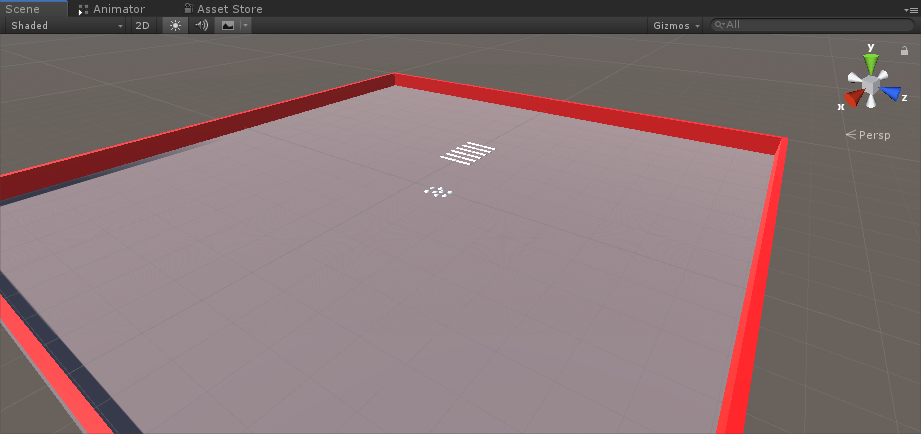
- Crie uma nova cena e chame-a de "Playground" (Ou se quiser manter um nome diferente, certifique-se de alterar o nome nesta linha PhotonNetwork.LoadLevel("Playground"); no PUN2_GameLobby.cs).
No meu caso, usarei uma cena simples com um avião e alguns cubos:
- Crie um novo script e chame-o de PUN2_RoomController (este script irá lidar com a lógica dentro da Room, como gerar os jogadores, mostrar a lista de jogadores, etc.) e cole o código abaixo dentro dele:
PUN2_RoomController.cs
using UnityEngine;
using Photon.Pun;

public class PUN2_RoomController : MonoBehaviourPunCallbacks
{

    //Player instance prefab, must be located in the Resources folder
    public GameObject playerPrefab;
    //Player spawn point
    public Transform[] spawnPoints;

    // Use this for initialization
    void Start()
    {
        //In case we started this demo with the wrong scene being active, simply load the menu scene
        if (PhotonNetwork.CurrentRoom == null)
        {
            Debug.Log("Is not in the room, returning back to Lobby");
            UnityEngine.SceneManagement.SceneManager.LoadScene("GameLobby");
            return;
        }

        //We're in a room. spawn a character for the local player. it gets synced by using PhotonNetwork.Instantiate
        PhotonNetwork.Instantiate(playerPrefab.name, spawnPoints[Random.Range(0, spawnPoints.Length - 1)].position, spawnPoints[Random.Range(0, spawnPoints.Length - 1)].rotation, 0);
    }

    void OnGUI()
    {
        if (PhotonNetwork.CurrentRoom == null)
            return;

        //Leave this Room
        if (GUI.Button(new Rect(5, 5, 125, 25), "Leave Room"))
        {
            PhotonNetwork.LeaveRoom();
        }

        //Show the Room name
        GUI.Label(new Rect(135, 5, 200, 25), PhotonNetwork.CurrentRoom.Name);

        //Show the list of the players connected to this Room
        for (int i = 0; i < PhotonNetwork.PlayerList.Length; i++)
        {
            //Show if this player is a Master Client. There can only be one Master Client per Room so use this to define the authoritative logic etc.)
            string isMasterClient = (PhotonNetwork.PlayerList[i].IsMasterClient ? ": MasterClient" : "");
            GUI.Label(new Rect(5, 35 + 30 * i, 200, 25), PhotonNetwork.PlayerList[i].NickName + isMasterClient);
        }
    }

    public override void OnLeftRoom()
    {
        //We have left the Room, return back to the GameLobby
        UnityEngine.SceneManagement.SceneManager.LoadScene("GameLobby");
    }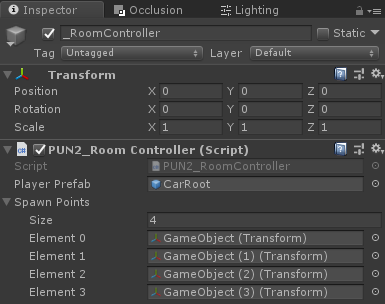
}- Crie um novo GameObject na cena "Playground" e chame-o "_RoomController"
- Anexe um script PUN2_RoomController ao objeto _RoomController
- Atribua um carro pré-fabricado e SpawnPoints e salve a cena
- Adicione cenas de GameLobby e Playground às configurações de construção:

4. Fazendo uma construção de teste
Agora é hora de fazer uma compilação e testá-la:

Tudo funciona como esperado!