Photon Network (Clássico) Guia do Iniciante
Photon Network é um serviço para Unity que permite aos desenvolvedores criar jogos multiplayer em tempo real.
Ele fornece uma API poderosa e fácil de usar, o que a torna perfeita até mesmo para desenvolvedores novatos.
Nesta postagem, faremos o download dos arquivos necessários, configuraremos o Photon AppID e programaremos um exemplo multijogador simples.
Parte 1: Configurando a Rede Photon
O primeiro passo é baixar o pacote Photon Network do Asset Store. Ele contém todos os scripts e arquivos necessários para integração multijogador.
- Abra seu Unity projeto e vá para Asset Store : (Janela -> Geral -> AssetStore) ou pressione Ctrl+9
- Pesquise "Photon Unity Networking Classic - Free" e clique no primeiro resultado ou clique aqui
- Importe o pacote Photon após a conclusão do download


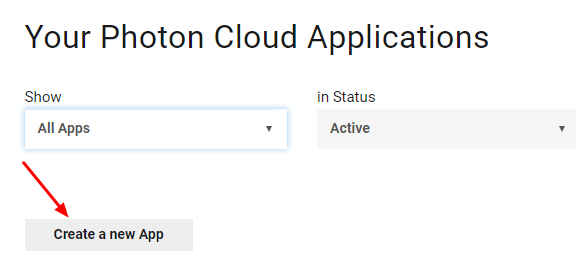
- Após a importação do pacote, você precisa criar um Photon App ID, isso é feito no site: https://www.photonengine.com/
- Crie uma nova conta (ou faça login em sua conta existente)
- Vá para a página Aplicativos clicando no ícone de perfil e depois em "Seus aplicativos" ou siga este link: https://dashboard.photonengine.com/en-US/PublicCloud
- Na página Aplicativos, clique em "Criar novo aplicativo"
- Na página de criação, para Photon Type, selecione "Photon Realtime" e para Name, digite qualquer nome e clique em "Create"
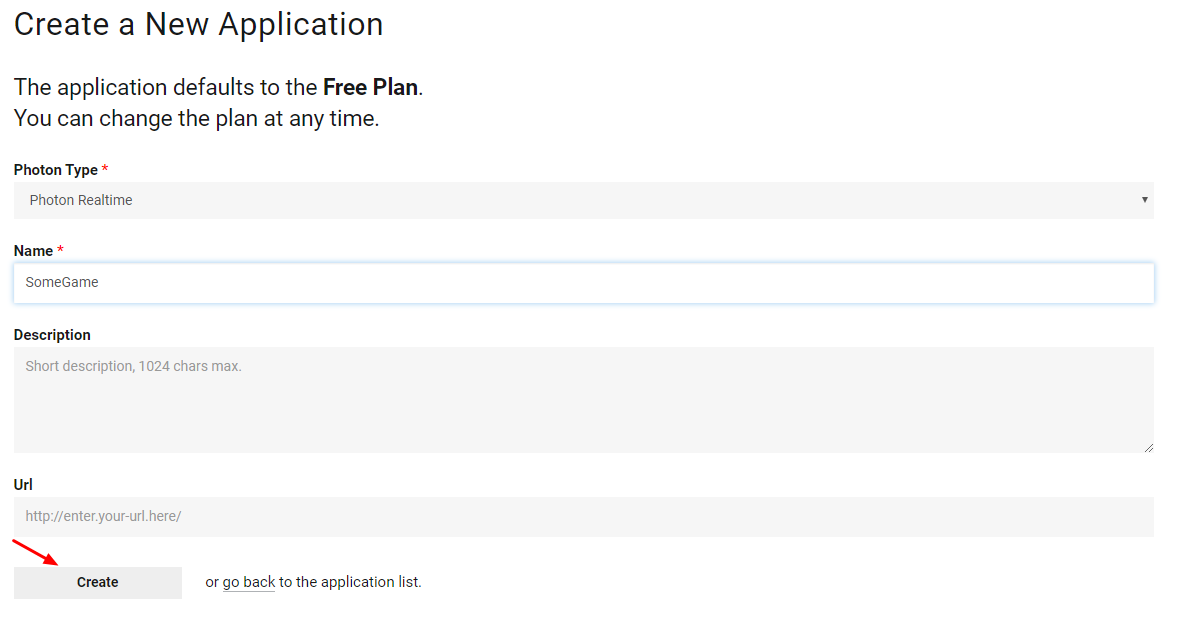
Como você pode ver, o padrão do aplicativo é o plano gratuito. Você pode ler mais sobre os Planos de preços aqui
- Assim que o aplicativo for criado, copie o ID do aplicativo localizado sob o nome do aplicativo

- Volte para seu projeto Unity e vá para Janela -> Photon Unity Rede -> Assistente de trocadilhos
- No PUN Wizard, clique em "Setup Project", cole seu App ID e clique em "Setup Project"
- A Photon Network está pronta
Parte 2: Criando um jogo multijogador
Agora vamos para a parte em que realmente criamos um jogo multijogador.
A maneira como o multijogador é tratado no Photon é:
- Primeiro, nos conectamos à região Photon (ex. Leste dos EUA, Europa, Ásia, etc.), que também é conhecida como Lobby.
- Uma vez no Lobby, solicitamos todas as Salas criadas na região, então podemos entrar em uma das Salas ou criar nossa própria Sala.
- Depois de entrarmos na sala, solicitamos uma lista dos jogadores conectados à sala e instanciamos suas instâncias de Player, que são sincronizadas com suas instâncias locais por meio do PhotonView.
- Quando alguém sai da Sala, sua instância é destruída e ele é removido da Lista de Jogadores.
1. Configurando um Lobby
Vamos começar criando um MainMenu que conterá uma lógica de Lobby (Navegar por salas existentes, criar novas salas, etc.).
- Crie uma nova cena e chame-a de "MainMenu"
- Crie um novo script C# e chame-o de GameLobby
- Na cena MainMenu, crie um novo GameObject. Chame-o de "_GameLobby" e anexe o script GameLobby a ele
Agora abra o script GameLobby.
Primeiro, vamos criar todas as variáveis necessárias:
    //Our player name
    string playerName = "Player 1";
    //This client's version number. Users are separated from each other by gameversion (which allows you to make breaking changes).
    string gameVersion = "0.9";
    //The list of created rooms
    RoomInfo[] createdRooms = new RoomInfo[0];
    //Use this name when creating a Room
    string roomName = "Room 1";
    Vector2 roomListScroll = Vector2.zero;
    bool joiningRoom = false;
A próxima coisa que precisamos fazer é ativar o Lobby de entrada automática e as estatísticas do Lobby, isso nos permitirá receber a lista de salas. Isso é feito no void Start().
Além disso, ativamos automaticamente o SyncScene para que a cena seja sincronizada automaticamente assim que entrarmos na sala.
E por último, chamamos PhotonNetwork.ConnectUsingSettings para conectar.
    // Use this for initialization
    void Start()
    {
        //Automatically join Lobby after we connect to Photon Region
        PhotonNetwork.PhotonServerSettings.JoinLobby = true;
        //Enable Lobby Stats to receive the list of Created rooms
        PhotonNetwork.PhotonServerSettings.EnableLobbyStatistics = true;
        //This makes sure we can use PhotonNetwork.LoadLevel() on the master client and all clients in the same room sync their level automatically
        PhotonNetwork.automaticallySyncScene = true;

        if (!PhotonNetwork.connected)
        {
            // Connect to the photon master-server. We use the settings saved in PhotonServerSettings (a .asset file in this project)
            PhotonNetwork.ConnectUsingSettings(gameVersion);
        }
    }
Para saber se uma conexão com o Photon Cloud foi bem-sucedida, temos que implementar estes 2 callbacks: OnReceivedRoomListUpdate() e OnFailedToConnectToPhoton(parâmetros do objeto).
    void OnFailedToConnectToPhoton(object parameters)
    {
        Debug.Log("OnFailedToConnectToPhoton. StatusCode: " + parameters + " ServerAddress: " + PhotonNetwork.ServerAddress);
        //Try to connect again
        PhotonNetwork.ConnectUsingSettings(gameVersion);
    }

    void OnReceivedRoomListUpdate()
    {
        Debug.Log("We have received the Room list");
        //After this callback, PhotonNetwork.GetRoomList() becomes available
        createdRooms = PhotonNetwork.GetRoomList();
    }
A seguir vem a parte da interface do usuário, onde a navegação e a criação da sala são feitas:
E, finalmente, implementamos outros 4 callbacks: OnPhotonCreateRoomFailed(), OnPhotonJoinRoomFailed(object[] cause), OnCreatedRoom() e OnJoinedRoom().
Esses retornos de chamada são usados para determinar se entramos/criamos a sala ou se houve algum problema durante a conexão.
    void OnPhotonCreateRoomFailed()
    {
        Debug.Log("OnPhotonCreateRoomFailed got called. This can happen if the room exists (even if not visible). Try another room name.");
        joiningRoom = false;
    }

    void OnPhotonJoinRoomFailed(object[] cause)
    {
        Debug.Log("OnPhotonJoinRoomFailed got called. This can happen if the room is not existing or full or closed.");
        joiningRoom = false;
    }

    void OnCreatedRoom()
    {
        Debug.Log("OnCreatedRoom");
        //Set our player name
        PhotonNetwork.playerName = playerName;
        //Load the Scene called GameLevel (Make sure it's added to build settings)
        PhotonNetwork.LoadLevel("GameLevel");
    }

    void OnJoinedRoom()
    {
        Debug.Log("OnJoinedRoom");
    }
E aqui está o script GameLobby.cs final:
using System.Collections;
using System.Collections.Generic;
using UnityEngine;
public class GameLobby : MonoBehaviour
{
//Our player name
string playerName = "Player 1";
//This client's version number. Users are separated from each other by gameversion (which allows you to make breaking changes).
string gameVersion = "0.9";
//The list of created rooms
RoomInfo[] createdRooms = new RoomInfo[0];
//Use this name when creating a Room
string roomName = "Room 1";
Vector2 roomListScroll = Vector2.zero;
bool joiningRoom = false;
// Use this for initialization
void Start()
{
//Automatically join Lobby after we connect to Photon Region
PhotonNetwork.PhotonServerSettings.JoinLobby = true;
//Enable Lobby Stats to receive the list of Created rooms
PhotonNetwork.PhotonServerSettings.EnableLobbyStatistics = true;
//This makes sure we can use PhotonNetwork.LoadLevel() on the master client and all clients in the same room sync their level automatically
PhotonNetwork.automaticallySyncScene = true;
if (!PhotonNetwork.connected)
{
// Connect to the photon master-server. We use the settings saved in PhotonServerSettings (a .asset file in this project)
PhotonNetwork.ConnectUsingSettings(gameVersion);
}
}
void OnFailedToConnectToPhoton(object parameters)
{
Debug.Log("OnFailedToConnectToPhoton. StatusCode: " + parameters + " ServerAddress: " + PhotonNetwork.ServerAddress);
//Try to connect again
PhotonNetwork.ConnectUsingSettings(gameVersion);
}
void OnReceivedRoomListUpdate()
{
Debug.Log("We have received the Room list");
//After this callback, PhotonNetwork.GetRoomList() becomes available
createdRooms = PhotonNetwork.GetRoomList();
}
void OnGUI()
{
GUI.Window(0, new Rect(Screen.width/2 - 450, Screen.height/2 - 200, 900, 400), LobbyWindow, "Lobby");
}
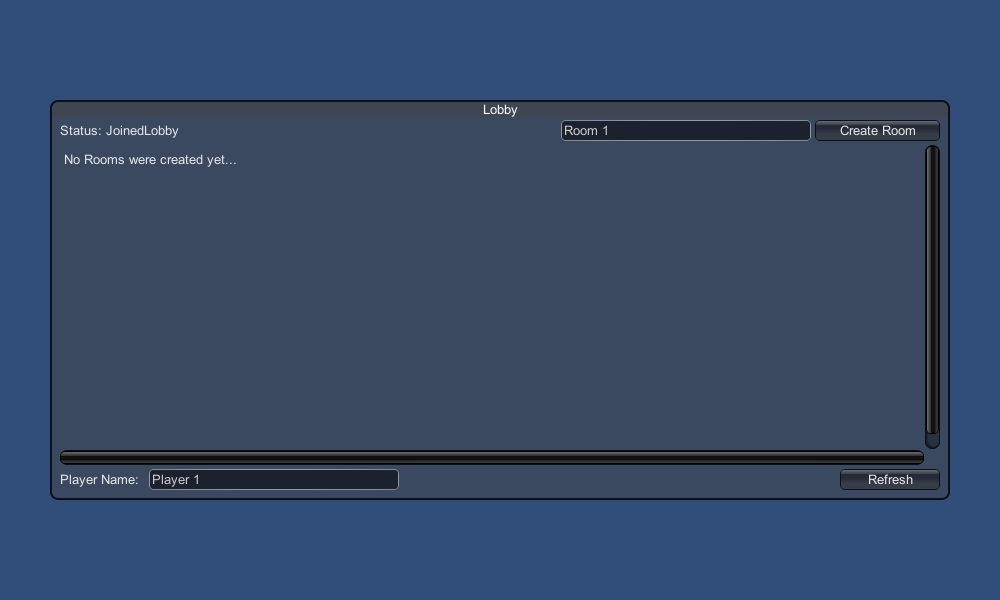
void LobbyWindow(int index)
{
//Connection Status and Room creation Button
GUILayout.BeginHorizontal();
GUILayout.Label("Status: " + PhotonNetwork.connectionStateDetailed);
if(joiningRoom || !PhotonNetwork.connected)
{
GUI.enabled = false;
}
GUILayout.FlexibleSpace();
//Room name text field
roomName = GUILayout.TextField(roomName, GUILayout.Width(250));
if (GUILayout.Button("Create Room", GUILayout.Width(125)))
{
if (roomName != "")
{
joiningRoom = true;
RoomOptions roomOptions = new RoomOptions();
roomOptions.IsOpen = true;
roomOptions.IsVisible = true;
roomOptions.MaxPlayers = (byte)10; //Set any number
PhotonNetwork.JoinOrCreateRoom(roomName, roomOptions, TypedLobby.Default);
}
}
GUILayout.EndHorizontal();
//Scroll through available rooms
roomListScroll = GUILayout.BeginScrollView(roomListScroll, true, true);
if(createdRooms.Length == 0)
{
GUILayout.Label("No Rooms were created yet...");
}
else
{
for(int i = 0; i < createdRooms.Length; i++)
{
GUILayout.BeginHorizontal("box");
GUILayout.Label(createdRooms[i].Name, GUILayout.Width(400));
GUILayout.Label(createdRooms[i].PlayerCount + "/" + createdRooms[i].MaxPlayers);
GUILayout.FlexibleSpace();
if (GUILayout.Button("Join Room"))
{
joiningRoom = true;
//Set our Player name
PhotonNetwork.playerName = playerName;
//Join the Room
PhotonNetwork.JoinRoom(createdRooms[i].Name);
}
GUILayout.EndHorizontal();
}
}
GUILayout.EndScrollView();
//Set player name and Refresh Room button
GUILayout.BeginHorizontal();
GUILayout.Label("Player Name: ", GUILayout.Width(85));
//Player name text field
playerName = GUILayout.TextField(playerName, GUILayout.Width(250));
GUILayout.FlexibleSpace();
GUI.enabled = PhotonNetwork.connectionState != ConnectionState.Connecting && !joiningRoom;
if (GUILayout.Button("Refresh", GUILayout.Width(100)))
{
if (PhotonNetwork.connected)
{
//We are already connected, simply update the Room list
createdRooms = PhotonNetwork.GetRoomList();
}
else
{
//We are not connected, estabilish a new connection
PhotonNetwork.ConnectUsingSettings(gameVersion);
}
}
GUILayout.EndHorizontal();
if (joiningRoom)
{
GUI.enabled = true;
GUI.Label(new Rect(900/2 - 50, 400/2 - 10, 100, 20), "Connecting...");
}
}
void OnPhotonCreateRoomFailed()
{
Debug.Log("OnPhotonCreateRoomFailed got called. This can happen if the room exists (even if not visible). Try another room name.");
joiningRoom = false;
}
void OnPhotonJoinRoomFailed(object[] cause)
{
Debug.Log("OnPhotonJoinRoomFailed got called. This can happen if the room is not existing or full or closed.");
joiningRoom = false;
}
void OnCreatedRoom()
{
Debug.Log("OnCreatedRoom");
//Set our player name
PhotonNetwork.playerName = playerName;
//Load the Scene called GameLevel (Make sure it's added to build settings)
PhotonNetwork.LoadLevel("GameLevel");
}
void OnJoinedRoom()
{
Debug.Log("OnJoinedRoom");
}
}2. Criando um prefab do Player
Em jogos Multijogador, a instância do Jogador tem 2 lados: Local e Remoto.
Uma instância local é controlada localmente (por nós).
A instância remota, por outro lado, é uma representação local do que o outro jogador está fazendo. Ele não deve ser afetado por nossa entrada.
Para determinar se a instância é Local ou Remota, usamos um PhotonView componente.
O PhotonView atua como um mensageiro que recebe e envia os valores que precisam ser sincronizados, por exemplo, posição e rotação.
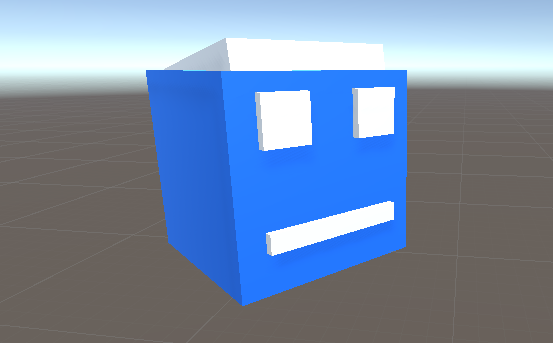
Vamos começar criando a instância do player (se você já tiver sua instância do player pronta, pode pular esta etapa).
No meu caso, a instância do Player será um cubo simples que é movido com as teclas W e S e girado com as teclas A e D.
E aqui está um script de controlador simples:
PlayerController.cs
using UnityEngine;
public class PlayerController : MonoBehaviour
{
// Update is called once per frame
void Update()
{
//Move Front/Back
if (Input.GetKey(KeyCode.W))
{
transform.Translate(transform.forward * Time.deltaTime * 2.45f, Space.World);
}
else if (Input.GetKey(KeyCode.S))
{
transform.Translate(-transform.forward * Time.deltaTime * 2.45f, Space.World);
}
//Rotate Left/Right
if (Input.GetKey(KeyCode.A))
{
transform.Rotate(new Vector3(0, -14, 0) * Time.deltaTime * 4.5f, Space.Self);
}
else if (Input.GetKey(KeyCode.D))
{
transform.Rotate(new Vector3(0, 14, 0) * Time.deltaTime * 4.5f, Space.Self);
}
}
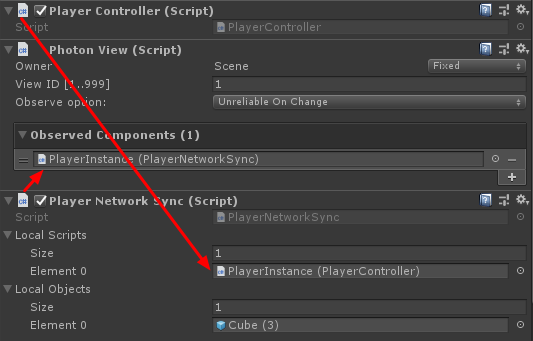
}A próxima etapa é adicionar um componente PhotonView.
- Adicionar um componente PhotonView para a instância do player
- Crie um novo script C#, chame-o de PlayerNetworkSync e abra-o (este script será usado para se comunicar através do PhotonView)
A primeira coisa que precisamos fazer é substituir MonoBehaviour por Photon.MonoBehaviour. Esta etapa é necessária para poder usar a variável photonView em cache em vez de usar GetComponent
public class PlayerNetworkSync: Photon.MonoBehaviourDepois disso, podemos passar para criar todas as variáveis necessárias:
    //List of the scripts that should only be active for the local player (ex. PlayerController, MouseLook etc.)
    public MonoBehaviour[] localScripts;
    //List of the GameObjects that should only be active for the local player (ex. Camera, AudioListener etc.)
    public GameObject[] localObjects;
    //Values that will be synced over network
    Vector3 latestPos;
    Quaternion latestRot;
Em seguida, no void Start() verificamos se o player é local ou remoto usando photonView.isMine:
    // Use this for initialization
    void Start()
    {
        if (photonView.isMine)
        {
            //Player is local
        }
        else
        {
            //Player is Remote
            for(int i = 0; i < localScripts.Length; i++)
            {
                localScripts[i].enabled = false;
            }
            for (int i = 0; i < localObjects.Length; i++)
            {
                localObjects[i].SetActive(false);
            }
        }
    }
A sincronização real é feita por meio do retorno de chamada do PhotonView: OnPhotonSerializeView(PhotonStream stream, PhotonMessageInfo info):
    void OnPhotonSerializeView(PhotonStream stream, PhotonMessageInfo info)
    {
        if (stream.isWriting)
        {
            //We own this player: send the others our data
            stream.SendNext(transform.position);
            stream.SendNext(transform.rotation);
        }
        else
        {
            //Network player, receive data
            latestPos = (Vector3)stream.ReceiveNext();
            latestRot = (Quaternion)stream.ReceiveNext();
        }
    }
Nesse caso, enviamos apenas a posição e a rotação do player, mas você pode usar o exemplo acima para enviar qualquer valor que precise ser sincronizado pela rede, em alta frequência.
Os valores recebidos são então aplicados no void Update():
    // Update is called once per frame
    void Update()
    {
        if (!photonView.isMine)
        {
            //Update remote player (smooth this, this looks good, at the cost of some accuracy)
            transform.position = Vector3.Lerp(transform.position, latestPos, Time.deltaTime * 5);
            transform.rotation = Quaternion.Lerp(transform.rotation, latestRot, Time.deltaTime * 5);
        }
    }
Aqui está o script PlayerNetworkSync.cs final:
using System.Collections;
using System.Collections.Generic;
using UnityEngine;

public class PlayerNetworkSync : Photon.MonoBehaviour
{
    //List of the scripts that should only be active for the local player (ex. PlayerController, MouseLook etc.)
    public MonoBehaviour[] localScripts;
    //List of the GameObjects that should only be active for the local player (ex. Camera, AudioListener etc.)
    public GameObject[] localObject;
    //Values that will be synced over network
    Vector3 latestPos;
    Quaternion latestRot;

    // Use this for initialization
    void Start()
    {
        if (photonView.isMine)
        {
            //Player is local
        }
        else
        {
            //Player is Remote
            for(int i = 0; i < localScripts.Length; i++)
            {
                localScripts[i].enabled = false;
            }
            for (int i = 0; i < localObject.Length; i++)
            {
                localObject[i].SetActive(false);
            }
        }
    }

    void OnPhotonSerializeView(PhotonStream stream, PhotonMessageInfo info)
    {
        if (stream.isWriting)
        {
            //We own this player: send the others our data
            stream.SendNext(transform.position);
            stream.SendNext(transform.rotation);
        }
        else
        {
            //Network player, receive data
            latestPos = (Vector3)stream.ReceiveNext();
            latestRot = (Quaternion)stream.ReceiveNext();
        }
    }

    // Update is called once per frame
    void Update()
    {
        if (!photonView.isMine)
        {
            //Update remote player (smooth this, this looks good, at the cost of some accuracy)
            transform.position = Vector3.Lerp(transform.position, latestPos, Time.deltaTime * 5);
            transform.rotation = Quaternion.Lerp(transform.rotation, latestRot, Time.deltaTime * 5);
        }
    }
}- Adicionar o script PlayerNetworkSync.cs para o PlayerInstance e atribua-o aos componentes observados do PhotonView.
- Atribua o PlayerCntroller.cs aos "Scripts locais" e atribua os GameObjects (que você deseja desativar para jogadores remotos) aos "Objetos locais"
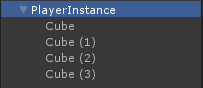
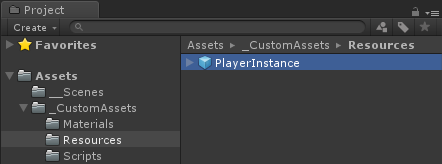
- Salve o PlayerInstance em Prefab e mova-o para a pasta chamada Resources (se não houver tal pasta, crie uma). Esta etapa é necessária para gerar objetos multijogador na rede.
3. Criando um nível de jogo
GameLevel é uma cena que é carregada após entrar na sala e é onde toda a ação acontece.
- Crie uma nova Cena e chame-a de "GameLevel" (Ou se você quiser manter um nome diferente, certifique-se de mudar o nome nesta linha PhotonNetwork.LoadLevel("GameLevel"); no GameLobby.cs) .
No meu caso, usarei uma Cena simples com um Plano:

- Agora crie um novo script e chame-o de RoomController. Este script irá lidar com a lógica dentro da Sala (como gerar os jogadores, mostrar a lista de jogadores, etc.).
Vamos começar definindo as variáveis necessárias:
    //Player instance prefab, must be located in the Resources folder
    public GameObject playerPrefab;
    //Player spawn point
    public Transform spawnPoint;
Para instanciar o player prefab, usamos PhotonNetwork .Instanciar:
    // Use this for initialization
    void Start()
    {
        //In case we started this demo with the wrong scene being active, simply load the menu scene
        if (!PhotonNetwork.connected)
        {
            UnityEngine.SceneManagement.SceneManager.LoadScene("MainMenu");
            return;
        }

        //We're in a room. spawn a character for the local player. it gets synced by using PhotonNetwork.Instantiate
        PhotonNetwork.Instantiate(playerPrefab.name, spawnPoint.position, Quaternion.identity, 0);
    }
E uma interface simples com um botão "Sair da sala" e alguns elementos adicionais, como o nome da sala e a lista de jogadores conectados:
    void OnGUI()
    {
        if (PhotonNetwork.room == null)
            return;

        //Leave this Room
        if (GUI.Button(new Rect(5, 5, 125, 25), "Leave Room"))
        {
            PhotonNetwork.LeaveRoom();
        }

        //Show the Room name
        GUI.Label(new Rect(135, 5, 200, 25), PhotonNetwork.room.Name);

        //Show the list of the players connected to this Room
        for (int i = 0; i < PhotonNetwork.playerList.Length; i++)
        {
            //Show if this player is a Master Client. There can only be one Master Client per Room so use this to define the authoritative logic etc.)
            string isMasterClient = (PhotonNetwork.playerList[i].IsMasterClient ? ": MasterClient" : "");
            GUI.Label(new Rect(5, 35 + 30 * i, 200, 25), PhotonNetwork.playerList[i].NickName + isMasterClient);
        }
    }
E, finalmente, implementamos outro callback PhotonNetwork chamado OnLeftRoom() que é chamado quando saímos da sala:
    void OnLeftRoom()
    {
        //We have left the Room, return to the MainMenu
        UnityEngine.SceneManagement.SceneManager.LoadScene("MainMenu");
    }
E aqui está o script RoomController.cs final:
using UnityEngine;

public class RoomController : MonoBehaviour
{
    //Player instance prefab, must be located in the Resources folder
    public GameObject playerPrefab;
    //Player spawn point
    public Transform spawnPoint;

    // Use this for initialization
    void Start()
    {
        //In case we started this demo with the wrong scene being active, simply load the menu scene
        if (!PhotonNetwork.connected)
        {
            UnityEngine.SceneManagement.SceneManager.LoadScene("MainMenu");
            return;
        }

        //We're in a room. spawn a character for the local player. it gets synced by using PhotonNetwork.Instantiate
        PhotonNetwork.Instantiate(playerPrefab.name, spawnPoint.position, Quaternion.identity, 0);
    }

    void OnGUI()
    {
        if (PhotonNetwork.room == null)
            return;

        //Leave this Room
        if (GUI.Button(new Rect(5, 5, 125, 25), "Leave Room"))
        {
            PhotonNetwork.LeaveRoom();
        }

        //Show the Room name
        GUI.Label(new Rect(135, 5, 200, 25), PhotonNetwork.room.Name);

        //Show the list of the players connected to this Room
        for (int i = 0; i < PhotonNetwork.playerList.Length; i++)
        {
            //Show if this player is a Master Client. There can only be one Master Client per Room so use this to define the authoritative logic etc.)
            string isMasterClient = (PhotonNetwork.playerList[i].IsMasterClient ? ": MasterClient" : "");
            GUI.Label(new Rect(5, 35 + 30 * i, 200, 25), PhotonNetwork.playerList[i].NickName + isMasterClient);
        }
    }

    void OnLeftRoom()
    {
        //We have left the Room, return to the MainMenu
        UnityEngine.SceneManagement.SceneManager.LoadScene("MainMenu");
    }
}- Por fim, crie um novo GameObject na cena GameLevel e chame-o de "_RoomController"
- Anexar o script RoomController para o objeto _RoomController
- Atribua o prefab PlayerInstance e um SpawnPoint Transform a ele e salve a cena
- Adicione MainMenu e GameLevel às configurações de construção.

4. Fazendo uma compilação de teste
Agora é hora de fazer uma compilação e testá-la:
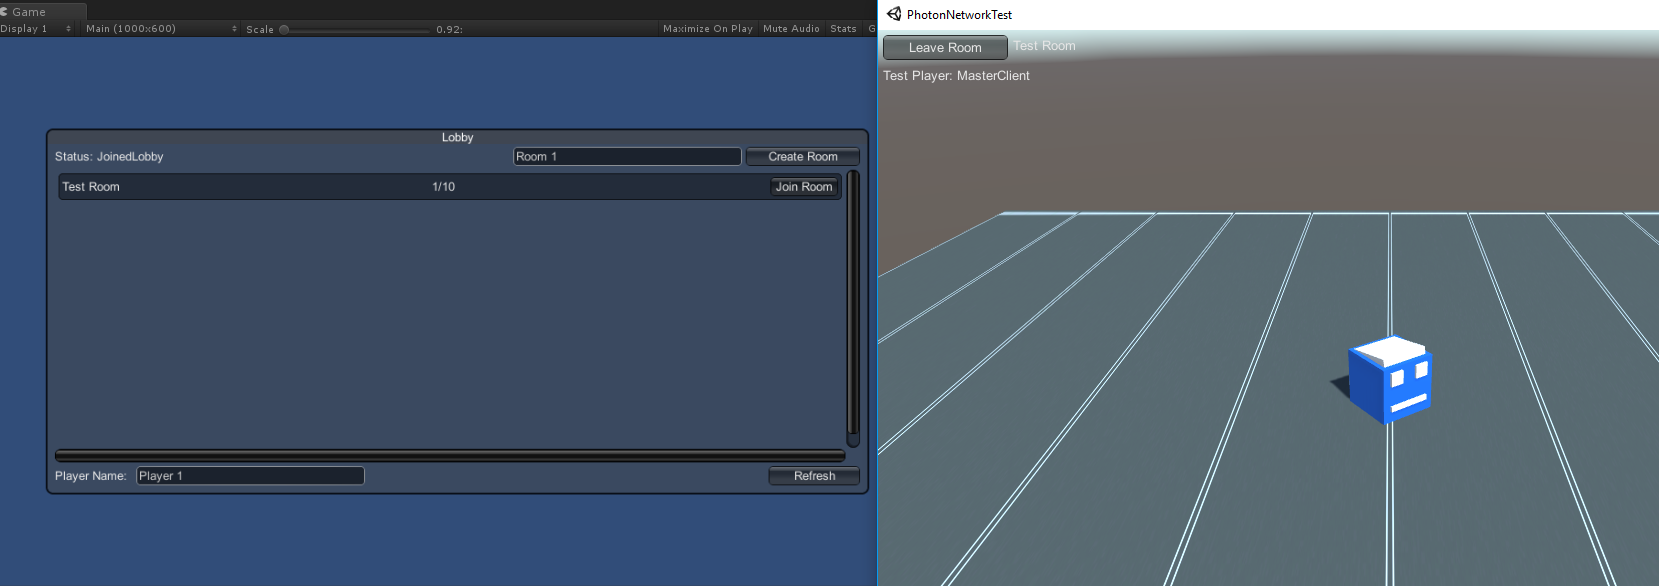
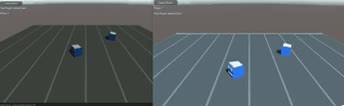
Tudo funciona como esperado!
Bônus
RPC
Na Photon Network, RPC significa Remote Procedure Call, é usado para chamar uma função em clientes remotos que estão na mesma sala (você pode ler mais sobre isso aqui).
Os RPCs têm muitos usos, por exemplo, digamos que você precise enviar uma mensagem de bate-papo para todos os jogadores na Sala. Com RPCs, é fácil de fazer.
[PunRPC]
void ChatMessage(string senderName, string messageText)
{
    Debug.Log(string.Format("{0}: {1}", senderName, messageText));
}
Observe o [PunRPC] antes da função. Esse atributo é necessário se você planeja chamar a função por meio de RPCs.
Para chamar as funções marcadas como RPC, você precisa de um PhotonView. Exemplo de chamada:
PhotonView photonView = PhotonView.Get(this);
photonView.RPC("ChatMessage", PhotonTargets.All, PhotonNetwork.playerName, "Some message");
Dica profissional: se o seu script for um Photon.MonoBehaviour ou Photon.PunBehaviour você pode usar: this.photonView.RPC().
Propriedades personalizadas
Na Photon Network, Custom Properties é um Hashtable que pode ser atribuído ao Player ou ao Room.
Isso é útil quando você precisa definir dados persistentes que não precisam ser alterados com frequência (por exemplo, nome do time do jogador, modo de jogo da sala, etc.).
Primeiro, você deve definir um Hashtable, o que é feito adicionando a linha abaixo no início do script:
//Replace default Hashtables with Photon hashtables
using Hashtable = ExitGames.Client.Photon.Hashtable;
O exemplo abaixo define as propriedades do quarto chamadas "GameMode" e "AnotherProperty":
        //Set Room properties (Only Master Client is allowed to set Room properties)
        if (PhotonNetwork.isMasterClient)
        {
            Hashtable setRoomProperties = new Hashtable();
            setRoomProperties.Add("GameMode", "FFA");
            setRoomProperties.Add("AnotherProperty", "Test");
            PhotonNetwork.room.SetCustomProperties(setRoomProperties);
        }

        //Will print "FFA"
        print((string)PhotonNetwork.room.CustomProperties["GameMode"]);
        //Will print "Test"
        print((string)PhotonNetwork.room.CustomProperties["AnotherProperty"]);
As propriedades do jogador são definidas de forma semelhante:
        //Set our Player's property
        Hashtable setPlayerProperties = new Hashtable();
        setPlayerProperties.Add("PlayerHP", (float)100);
        PhotonNetwork.player.SetCustomProperties(setPlayerProperties);

        //Will print "100"
        print((float)PhotonNetwork.player.CustomProperties["PlayerHP"]);
Para remover uma propriedade específica, basta definir seu valor como nulo.
        //Remove property called "PlayerHP" from Player properties
        Hashtable setPlayerProperties = new Hashtable();
        setPlayerProperties.Add("PlayerHP", null);
        PhotonNetwork.player.SetCustomProperties(setPlayerProperties);