Tutorial de controlador de jogador de cima para baixo para Unity
Muitas pessoas estão familiarizadas com gêneros de jogos como FPS (tiro em primeira pessoa) e RTS (estratégia em tempo real), mas também existem muitos jogos que não se enquadram em apenas uma categoria específica. Um desses jogos é o Top-Down Shooter.
Top-Down Shooter é um jogo onde o jogador é controlado de uma perspectiva de cima.
Exemplos de jogos de tiro de cima para baixo são Hotline Miami, Hotline Miami 2, Original Grand Theft Auto, etc.
Para fazer um controlador de personagem de cima para baixo em Unity, siga as etapas abaixo.
Etapa 1: crie os scripts
Para este tutorial, precisaremos apenas de um script.
- Crie um novo script, nomeie-o como SC_TopDownController, remova tudo dele e cole o código abaixo dentro dele:
SC_TopDownController.cs
using UnityEngine;

[RequireComponent(typeof(Rigidbody))]
[RequireComponent(typeof(CapsuleCollider))]

public class SC_TopDownController : MonoBehaviour
{
    //Player Camera variables
    public enum CameraDirection { x, z }
    public CameraDirection cameraDirection = CameraDirection.x;
    public float cameraHeight = 20f;
    public float cameraDistance = 7f;
    public Camera playerCamera;
    public GameObject targetIndicatorPrefab;
    //Player Controller variables
    public float speed = 5.0f;
    public float gravity = 14.0f;
    public float maxVelocityChange = 10.0f;
    public bool canJump = true;
    public float jumpHeight = 2.0f;
    //Private variables
    bool grounded = false;
    Rigidbody r;
    GameObject targetObject;
    //Mouse cursor Camera offset effect
    Vector2 playerPosOnScreen;
    Vector2 cursorPosition;
    Vector2 offsetVector;
    //Plane that represents imaginary floor that will be used to calculate Aim target position
    Plane surfacePlane = new Plane();

    void Awake()
    {
        r = GetComponent<Rigidbody>();
        r.freezeRotation = true;
        r.useGravity = false;

        //Instantiate aim target prefab
        if (targetIndicatorPrefab)
        {
            targetObject = Instantiate(targetIndicatorPrefab, Vector3.zero, Quaternion.identity) as GameObject;
        }

        //Hide the cursor
        Cursor.visible = false;
    }

    void FixedUpdate()
    {
        //Setup camera offset
        Vector3 cameraOffset = Vector3.zero;
        if (cameraDirection == CameraDirection.x)
        {
            cameraOffset = new Vector3(cameraDistance, cameraHeight, 0);
        }
        else if (cameraDirection == CameraDirection.z)
        {
            cameraOffset = new Vector3(0, cameraHeight, cameraDistance);
        }

        if (grounded)
        {
            Vector3 targetVelocity = Vector3.zero;
            // Calculate how fast we should be moving
            if (cameraDirection == CameraDirection.x)
            {
                targetVelocity = new Vector3(Input.GetAxis("Vertical") * (cameraDistance >= 0 ? -1 : 1), 0, Input.GetAxis("Horizontal") * (cameraDistance >= 0 ? 1 : -1));
            }
            else if (cameraDirection == CameraDirection.z)
            {
                targetVelocity = new Vector3(Input.GetAxis("Horizontal") * (cameraDistance >= 0 ? -1 : 1), 0, Input.GetAxis("Vertical") * (cameraDistance >= 0 ? -1 : 1));
            }
            targetVelocity *= speed;

            // Apply a force that attempts to reach our target velocity
            Vector3 velocity = r.velocity;
            Vector3 velocityChange = (targetVelocity - velocity);
            velocityChange.x = Mathf.Clamp(velocityChange.x, -maxVelocityChange, maxVelocityChange);
            velocityChange.z = Mathf.Clamp(velocityChange.z, -maxVelocityChange, maxVelocityChange);
            velocityChange.y = 0;
            r.AddForce(velocityChange, ForceMode.VelocityChange);

            // Jump
            if (canJump && Input.GetButton("Jump"))
            {
                r.velocity = new Vector3(velocity.x, CalculateJumpVerticalSpeed(), velocity.z);
            }
        }

        // We apply gravity manually for more tuning control
        r.AddForce(new Vector3(0, -gravity * r.mass, 0));

        grounded = false;

        //Mouse cursor offset effect
        playerPosOnScreen = playerCamera.WorldToViewportPoint(transform.position);
        cursorPosition = playerCamera.ScreenToViewportPoint(Input.mousePosition);
        offsetVector = cursorPosition - playerPosOnScreen;

        //Camera follow
        playerCamera.transform.position = Vector3.Lerp(playerCamera.transform.position, transform.position + cameraOffset, Time.deltaTime * 7.4f);
        playerCamera.transform.LookAt(transform.position + new Vector3(-offsetVector.y * 2, 0, offsetVector.x * 2));

        //Aim target position and rotation
        targetObject.transform.position = GetAimTargetPos();
        targetObject.transform.LookAt(new Vector3(transform.position.x, targetObject.transform.position.y, transform.position.z));

        //Player rotation
        transform.LookAt(new Vector3(targetObject.transform.position.x, transform.position.y, targetObject.transform.position.z));
    }

    Vector3 GetAimTargetPos()
    {
        //Update surface plane
        surfacePlane.SetNormalAndPosition(Vector3.up, transform.position);

        //Create a ray from the Mouse click position
        Ray ray = playerCamera.ScreenPointToRay(Input.mousePosition);

        //Initialise the enter variable
        float enter = 0.0f;

        if (surfacePlane.Raycast(ray, out enter))
        {
            //Get the point that is clicked
            Vector3 hitPoint = ray.GetPoint(enter);

            //Move your cube GameObject to the point where you clicked
            return hitPoint;
        }

        //No raycast hit, hide the aim target by moving it far away
        return new Vector3(-5000, -5000, -5000);
    }

    void OnCollisionStay()
    {
        grounded = true;
    }

    float CalculateJumpVerticalSpeed()
    {
        // From the jump height and gravity we deduce the upwards speed
        // for the character to reach at the apex.
        return Mathf.Sqrt(2 * jumpHeight * gravity);
    }
}![]()
Etapa 2: crie o sombreador
Este tutorial também requer um shader personalizado, que é necessário para fazer com que o alvo Aim se sobreponha ao resto dos objetos (sempre no topo).
- Clique com o botão direito na visualização do projeto -> Criar -> Shader -> Standart Surface Shader
- Nomeie o sombreador "Cursor"
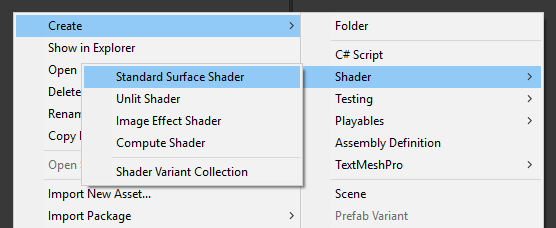
- Abra o shader, remova tudo que estiver dentro dele e cole o código abaixo:
Cursor.shader
Shader "Custom/FX/Cursor" {
	Properties {
		_MainTex ("Base", 2D) = "white" {}
	}

	CGINCLUDE

		#include "UnityCG.cginc"

		sampler2D _MainTex;

		half4 _MainTex_ST;

		struct v2f {
			half4 pos : SV_POSITION;
			half2 uv : TEXCOORD0;
		};

		v2f vert(appdata_full v) {
			v2f o;

			o.pos = UnityObjectToClipPos (v.vertex);
			o.uv.xy = TRANSFORM_TEX(v.texcoord, _MainTex);

			return o;
		}

		fixed4 frag( v2f i ) : COLOR {
			return tex2D (_MainTex, i.uv.xy);
		}

	ENDCG

	SubShader {
		Tags { "RenderType" = "Transparent" "Queue" = "Transparent+100"}
		Cull Off
		Lighting Off
		ZWrite Off
		ZTest Always
		Fog { Mode Off }
		Blend SrcAlpha OneMinusSrcAlpha

	Pass {

		CGPROGRAM

		#pragma vertex vert
		#pragma fragment frag
		#pragma fragmentoption ARB_precision_hint_fastest

		ENDCG

		}

	}
	FallBack Off
}![]()
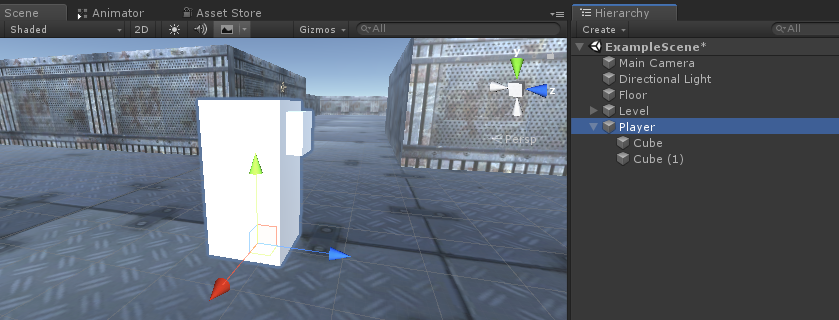
Etapa 3: configurar o controlador de personagem de cima para baixo
Vamos configurar um controlador de personagem de cima para baixo:
- Crie um novo GameObject e chame-o "Player"
- Crie um novo cubo e dimensione-o (no meu caso a escala é (1, 2, 1))
- Crie um segundo cubo, dimensione-o para um tamanho bem menor e mova-o para uma área superior (isto é simplesmente para saber em que direção o jogador está olhando)
- Mova ambos os cubos dentro do objeto "Player" e remova seus componentes BoxCollider
Agora, antes de prosseguir, vamos criar o pré-fabricado do alvo Aim:
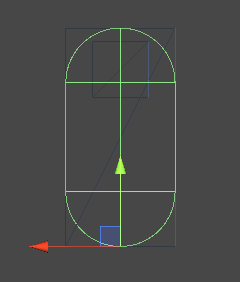
- Crie um novo GameObject e chame-o "AimTarget"
- Crie um novo Quad (GameObject -> Objeto 3D -> Quad) e mova-o dentro do objeto "AimTarget"
- Atribua a textura abaixo a um Quad e altere o Material Shader para 'Custom/FX/Cursor'

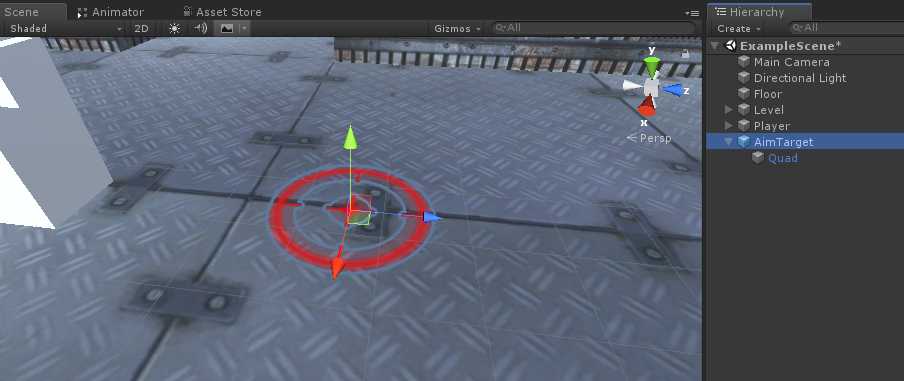
- Salve o "AimTarget" no Prefab e remova-o da cena
![]()
De volta à instância do Player:
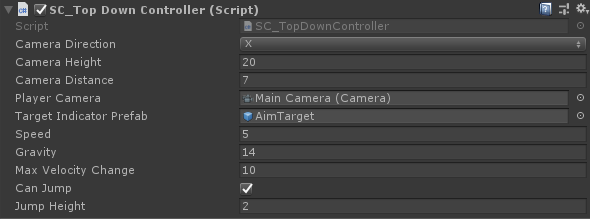
- Anexe o script SC_TopDownController ao objeto "Player" (você notará que ele adicionou alguns componentes adicionais, como Rigidbody e CapsuleCollider)
- Dimensione o CapsuleCollider até que ele corresponda ao modelo do jogador (no meu caso, a Altura está definida como 2 e o Centro está definido como (0, 1, 0)
- E finalmente, atribua as variáveis "Player Camera" e "Target Indicator Prefab" em SC_TopDownController
A instância Player agora está pronta, vamos testá-la:
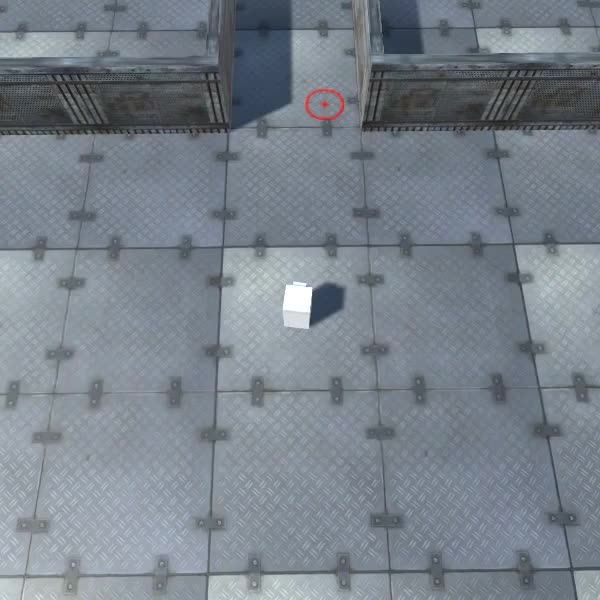
Tudo funciona conforme o esperado.